
Call us on 01403 888 222
Hortons Log Cabins
We're Open 7 Days
Hortons Log Cabins
We're Open 7 Days
We cover many different subjects on this FAQ page so we have an index below - please click on the title that interest you which will then take you to the appropriate section.
There is also further information within the "Resources" section in the footer at the very bottom of this page.
Q. Do you have a show site?
A. Yes. Please click on 'Our Showground', 'How to find us' or 'Why not visit our show site?' within the bar at the top of this page.
Q. How are log cabins measured?
A. Log cabin measurements are taken from the overall length of the logs (log-end' to 'log-end') that make each wall, excluding any roof overhangs and cantilevered roof canopies. Every log cabin has corner nibs, which support the corner joints. The nibs on our log cabins protrude from the main walls by 100mm (NB - this is 150mm for cabins made with round logs). The nibs are not load-bearing so they don't need to be supported by the base. All of the building measurements shown on our website are listed in a standard format with the first measurement listed being the wall dimension that has the main access doorway in it (i.e. the front of the building).
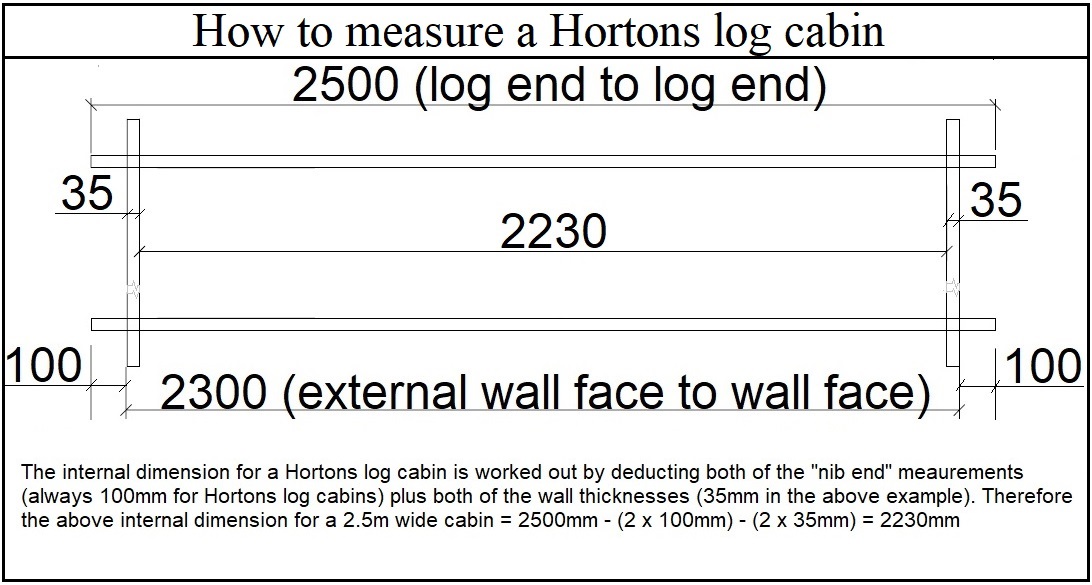
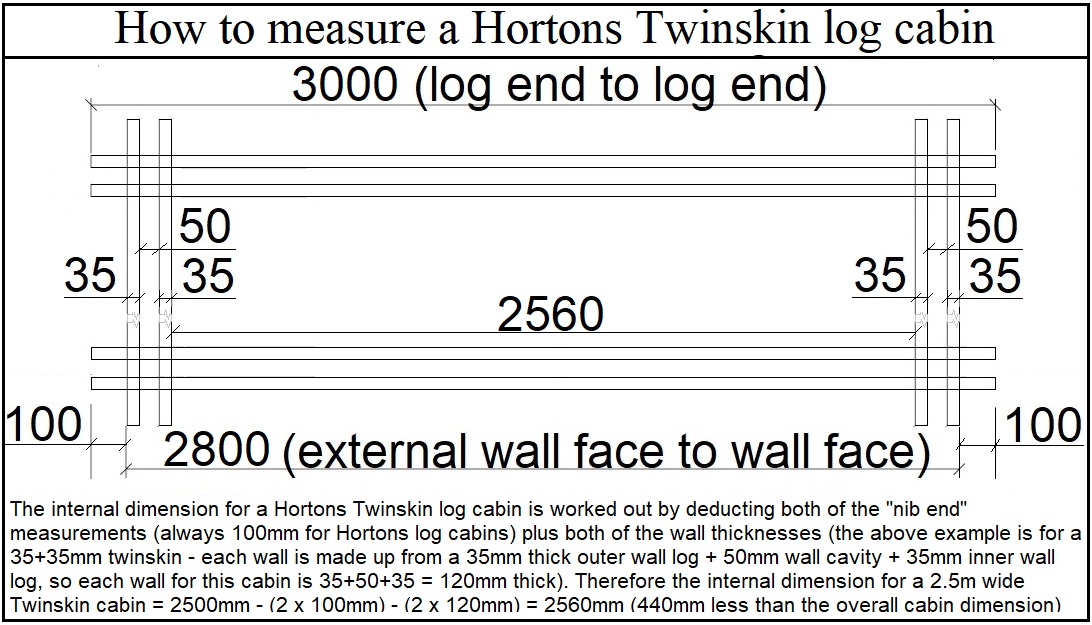
The above shows why the ideal base size should be 200mm less than the log end to log end measurement - the 100mm nibs that stick out on the corners do not rest on the bearers or base and therefore don't need to be supported underneath by the base.
Q. Can you make bespoke, made to measure log cabins?
A. Yes we can. We can make any size, shape or design - we ask for customers input at the beginning of the process which is then turned into full production plans for approval before manufacture begins and before any timber is cut. This way, we can ensure that we supply everything to the correct design and size. Our windows and doors are the only standard modules with a bespoke design, and they are supplied with standard architraves - sometimes these may be too wide or long to fit into a bespoke design and will need to be trimmed down to fit on site accordingly (this may also be necessary with some of our standard designs as well where the windows and doors are positioned very closely to each other). If your building needs to be over 6m in either direction, then this will require an intermediate supporting partition wall or a structural archway which looks like this -
Q. I have designed a building. Can you give me a quote?
A. Yes, we have a process, but, briefly, we will draw up a simple jpeg using MS Paint including doors, windows etc, revise and review it with you and then, after receipt of the deposit, we will submit our jpeg to our manufacturers who will produce detailed CAD drawings from which they will manufacture the building.
We will work very closely with you on a bespoke building. Our Terms and Conditions provide more detail of the process. You can call us for a preliminary discussion at any time.
Depending on the size and design of building, you may need to employ a structural engineer to work out the structural calculations for anything unique to your building (ie, wide clear span openings in walls, basework, etc), which in turn will need to be submitted to your local council and approved by your council BEFORE you confirm and approve the final production plans and your building goes into production. We do have stock calculations for standard elements (roof purlin strength and insulation values) which we are happy to forward on to you for submission to your council.
You are deemed to have all necessary approvals from your council when confirming your production plans - Hortons is not liable for any infringement of Planning laws (which includes Planning Permission and Building Regulations).
Q. Do you provide advice on Planning?
A. NB: This reply applies to the United Kingdom.
No. We do not provide Planning advice. Please see our Terms and Conditions.
UK Government advice can be found at: https://www.planningportal.co.uk/info/200130/common_projects/43/outbuildings/6
However, many of our log cabins do not require planning pemission but it is alway wise to check with your local planning department beforehand if you are not sure.
Q. How can I find out about delivery?
A. Please refer to our Delivery Policy.
Q.Which vehicle(s) do you use for deliveries?
A. Your log cabin could be delivered to you using either
We will advise you of your options when we arrange your delivery. Please see our Delivery Policy for more details.
Given the range of options we offer for delivery (we will inspect Google maps and also ask for photos of the site and surrounding area as well), it shouldn't be necessary to visit the site beforehand to assess the delivery. If however you still require a site visit regarding this, then the time taken by Hortons staff is chargeable and can be quoted before the visit is made (we require this to be paid for in advance to the visit).
If other machinery is required for the delivery to take place (large mobile cranes, telehandlers, all terrain forklifts, etc), then this is the responsibility of the customer (or their contractor / agent) to arrange and pay for directly to the plant hire company - Hortons will not undertake this for you.
Q. Where can I find information about Health and Safety?
A. NB: UK only - Please see the Health and Safety Executive website at: http://www.hse.gov.uk/index.htm.
Q. Can I cancel and return items if I change my mind?
A.. This is covered within our T&C's, but essentially yes within certain parameters -
The Buyer may return any delivered Goods within 14 days of delivery for any reason whatsoever and must notify the Hortons in writing via email. But we do point out that You have a statutory duty to take care of goods.....
Hortons will not accept returns or cancellations if the Goods have been altered by applying treatments or paints to any of the surfaces, or by cutting, altering or customising the Goods in any way or doing anything that could be deemed to be an act of the Buyer accepting the Goods as his or her own. The Buyer must keep any Goods he or she intends to return to the Seller in good condition and they must be returned in the same condition as the condition in which they were delivered (ie, "as new" and not weathered or dirty). If Goods are delivered flatpacked they must be returned in the same condition including complete disassembly and packed in such a way that they can be easily collected (ie not in a loose pile) - care must be taken to ensure that Goods returned are packed well to avoid damage or loss in transit. Goods returned which cannot be sold as new due to damage or wear and tear may be subject to a reduction in the refunds given.
If your order is placed through a business - ie, there is a business name on the order it is deemed to be a business purchase and governed by our B2B T&C's here and the above circumstance is covered under point 11.
A.We cannot offer a guarantee for a Hortons building as a whole because it is a timber building which relies on ongoing maintenance from our customers (regularly checking the integrity of the roofing material and re-painting as necessary), the long term stability of the bases that they are built on and also whether they have a damp proof membrane to protect against rising damp. However individual items have their own guarantees/warranties-
Log cabin wall logs - we cannot guarantee this part of the building as it requires ongoing maintenance from our customers (ie regular re-painting etc)
Timber framed buildings -
NB - you should NOT install your building tight up against any other structure/wall (unless it is totally weather tight and NO rain or moisture can penetrate between the 2 elements - even solid brick walls are not damp proof and rain can be driven through from the opposite side of the wall, again leading to damp between the 2 structures) as this will a) stop you maintaining your building (ie painting the walls), b) the paint will cease to adhere to the timber if it is constantly wet and flake off and c) trap water/damp between the 2 buildings and cause them to be constantly damp (especially through the winter months) leading to the possibility of the timber rotting. You must leave an air gap all around the building - some paints/stains/treatments do have fungicide in them but these are not to withstand the timber being constantly wet/damp over many months through winter, and will not prevent rot setting in. Our basecoat insecticide & fungicide is not a finish coat - YOU will need to apply at least 2 coats of a weatherproof timber treatment over it otherwise the rain will evenually wash it out of the timber leaving it unprotected and rot will set in.
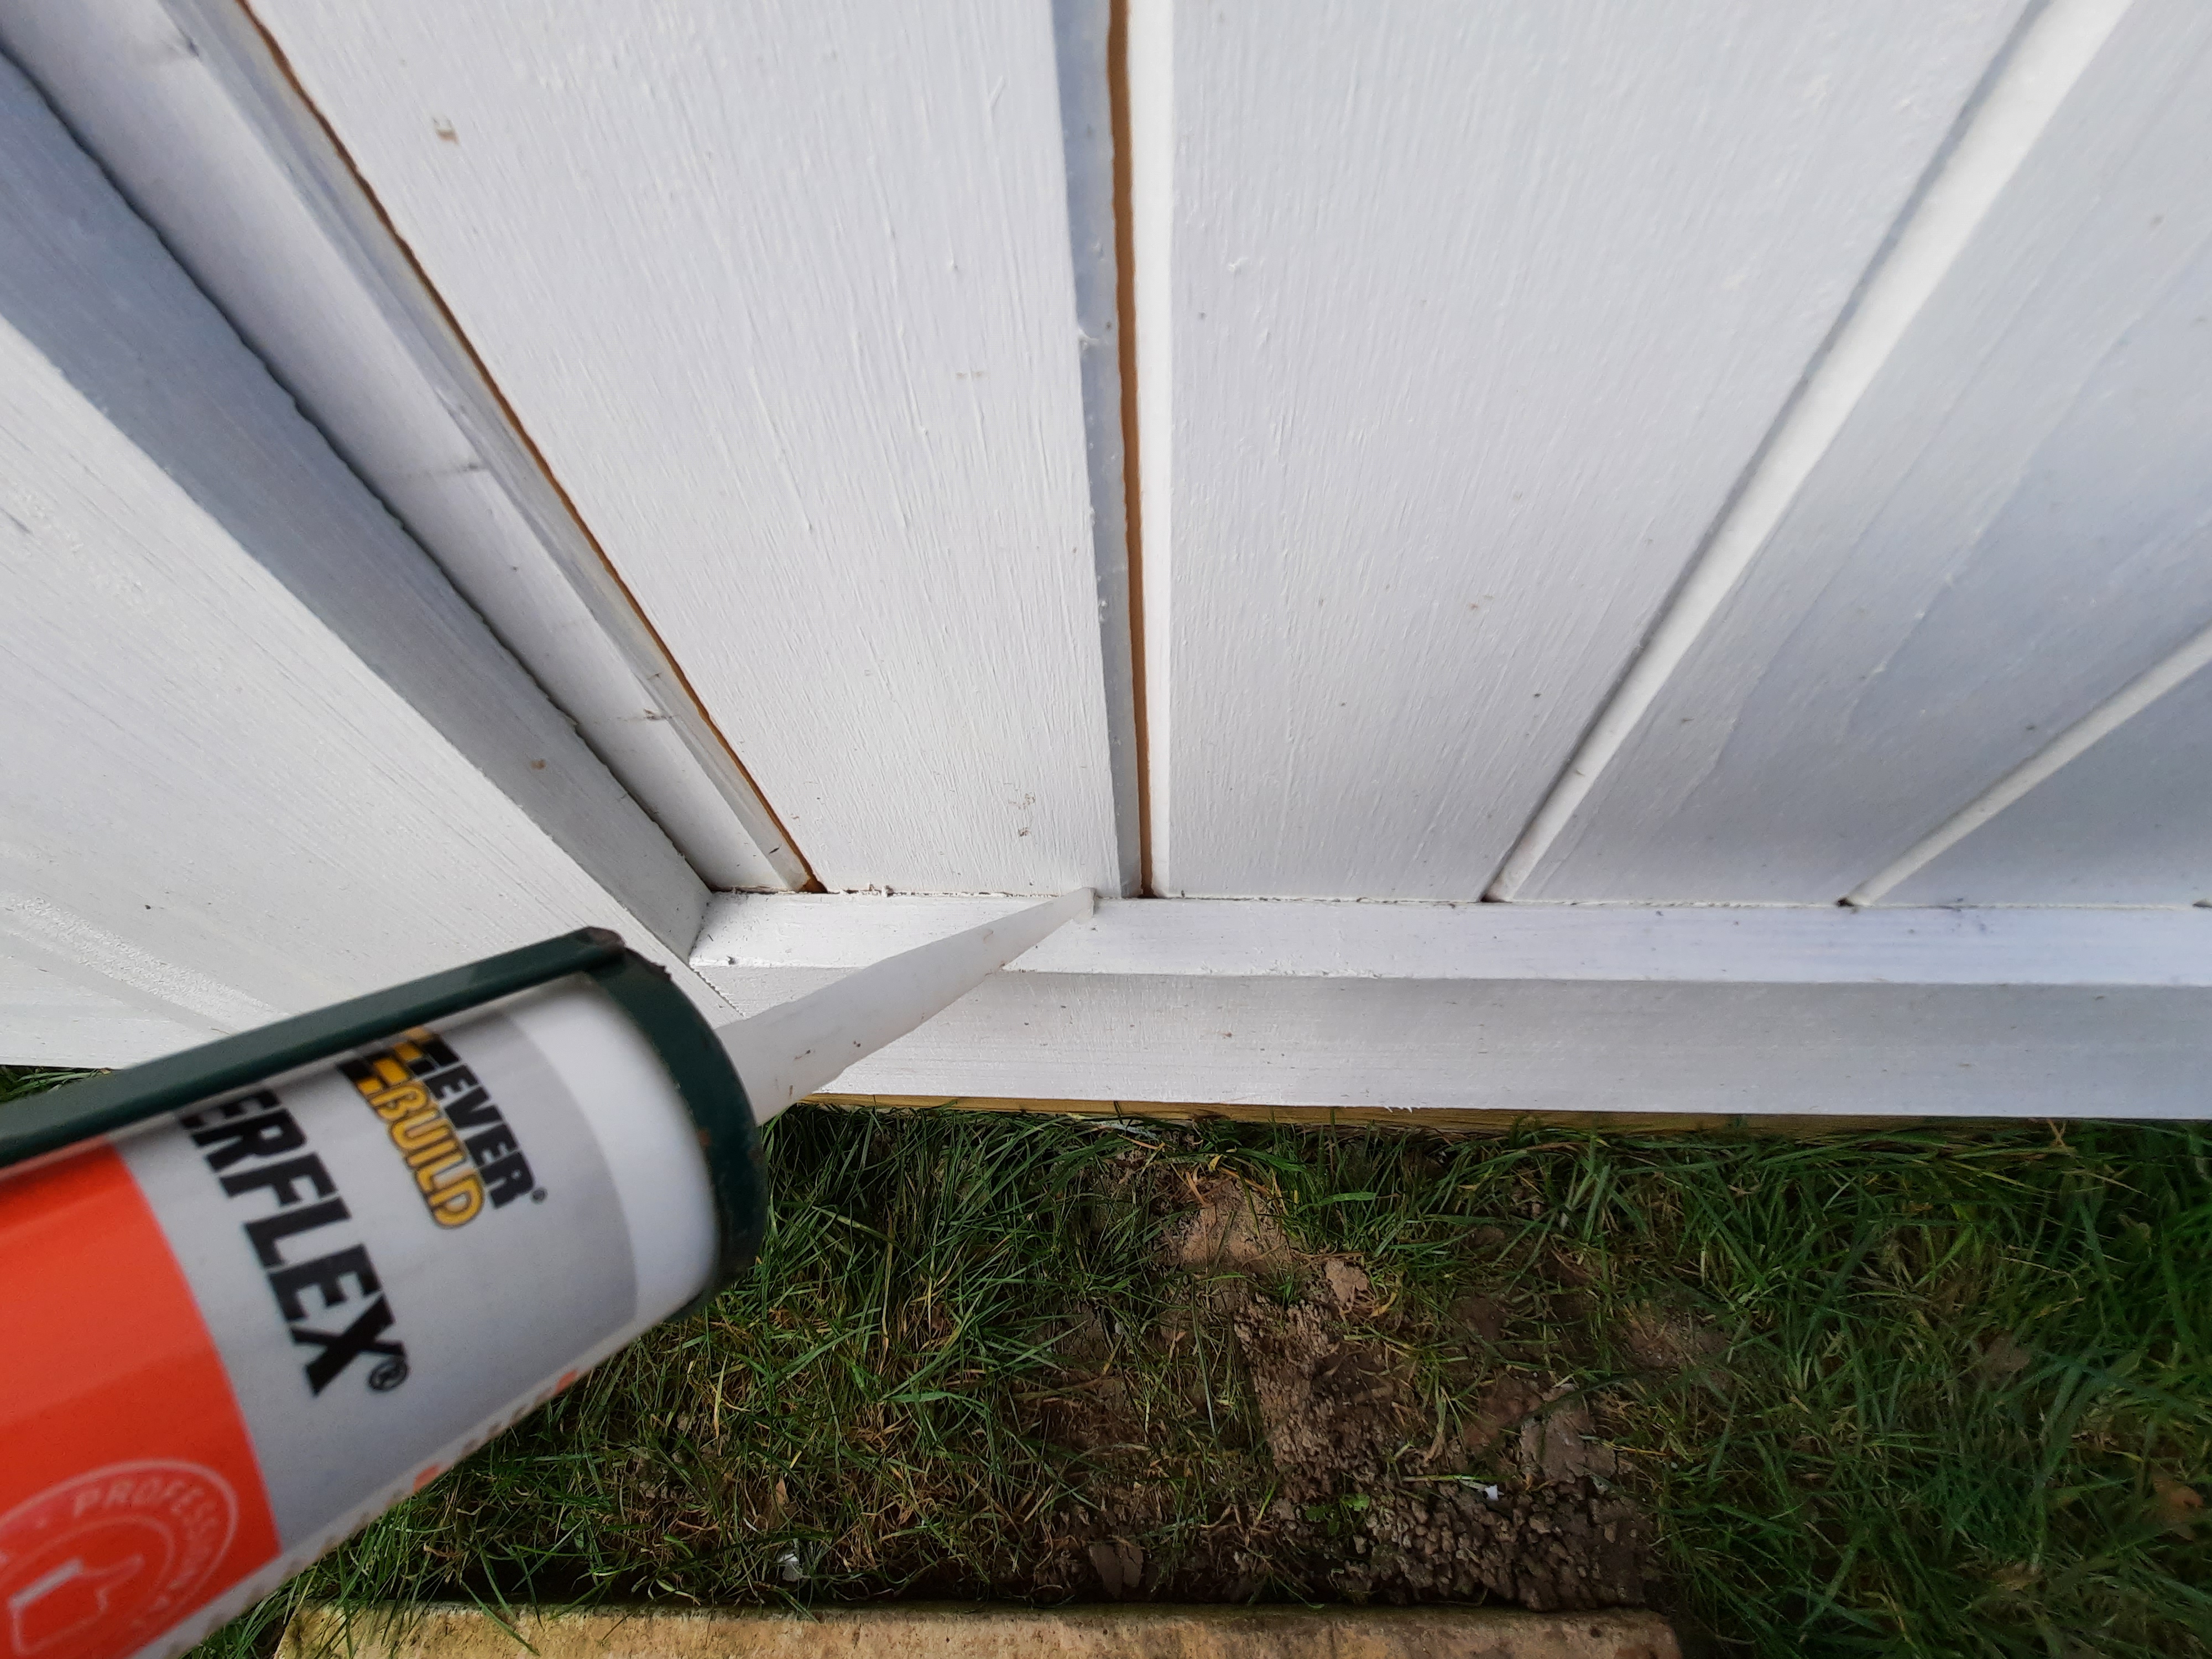
Fully boarded or half glazed doors - you need to apply flexible silicone or flexible caulking around all edges of the solid panel where the tongues and groove boarding meets the ledges and stiles of the door frame to stop rain water running down the T&G boards and penetrating into the rebated joint-
Q. What is a log cabin and how are they built?
A. Log cabins are made from individual "logs" layered up on top of each other and interlocked at the corners, there is no framework in a log cabin - the internal face of a log cabin is the same as the external face.
Given there is no framework holding it to a set height (like a shed wall where you see the framework when you walk inside it), the height of a log cabin changes (and must be allowed to change) through the seasons. Softwood timber can change size by up to +/- 3mm (-3mm in summer and +3mm in the winter) on each standard 150mm board width from its mid-range moisture content - an average log cabin is 14 boards high, meaning that it can change +/- 42mm through the seasons. The fact that this change may not be uniform all around the building - some walls may be exposed to driving rain (swelling the boards) or beating sunshine (drying the boards) whilst other walls are sheltered and protected (staying roughly unchanged) - means the walls or roof beams may not always be exactly true and level or the walls may experience changes in straightness and plumb level (because different walls may be at different heights). We allow expansion gaps above windows and doors to cater for the historic changes in moisture content in the UK. However, if there is an extreme weather event where the air temperature and/or air humidity then these tolerances may be tested beyond their design limits leading to small gaps (between the logs if extremely hot & dry or above the top trims of the window / door frames if extremely wet) - if this is the case, these minor issues will disappear when the weather conditions return to more normal conditions. The building will not be adversely affected long term by this.
The key thing to remember about log cabins is that they are fluid buildings and what is perfectly level and straight one week/month may not be next time it is checked (especially soon after installation whilst it goes through the initial settlement period). This is expected with log cabins and it does not affect the structural integrity of the building. However, if you fix anything vertically onto the walls (furniture, kitchen cupboards, plasterboard, shower screens etc), this will stop the walls moving and you could end up with gaps in the walls. This then allows all sorts of movement in the cabin as the roof could "sway" in the wind (you lose any shear resistance in the walls when logs become separated from its adjacent logs). In the worst case scenario some of the other walls or wall joints could be forced out of level and they could become loose as well.
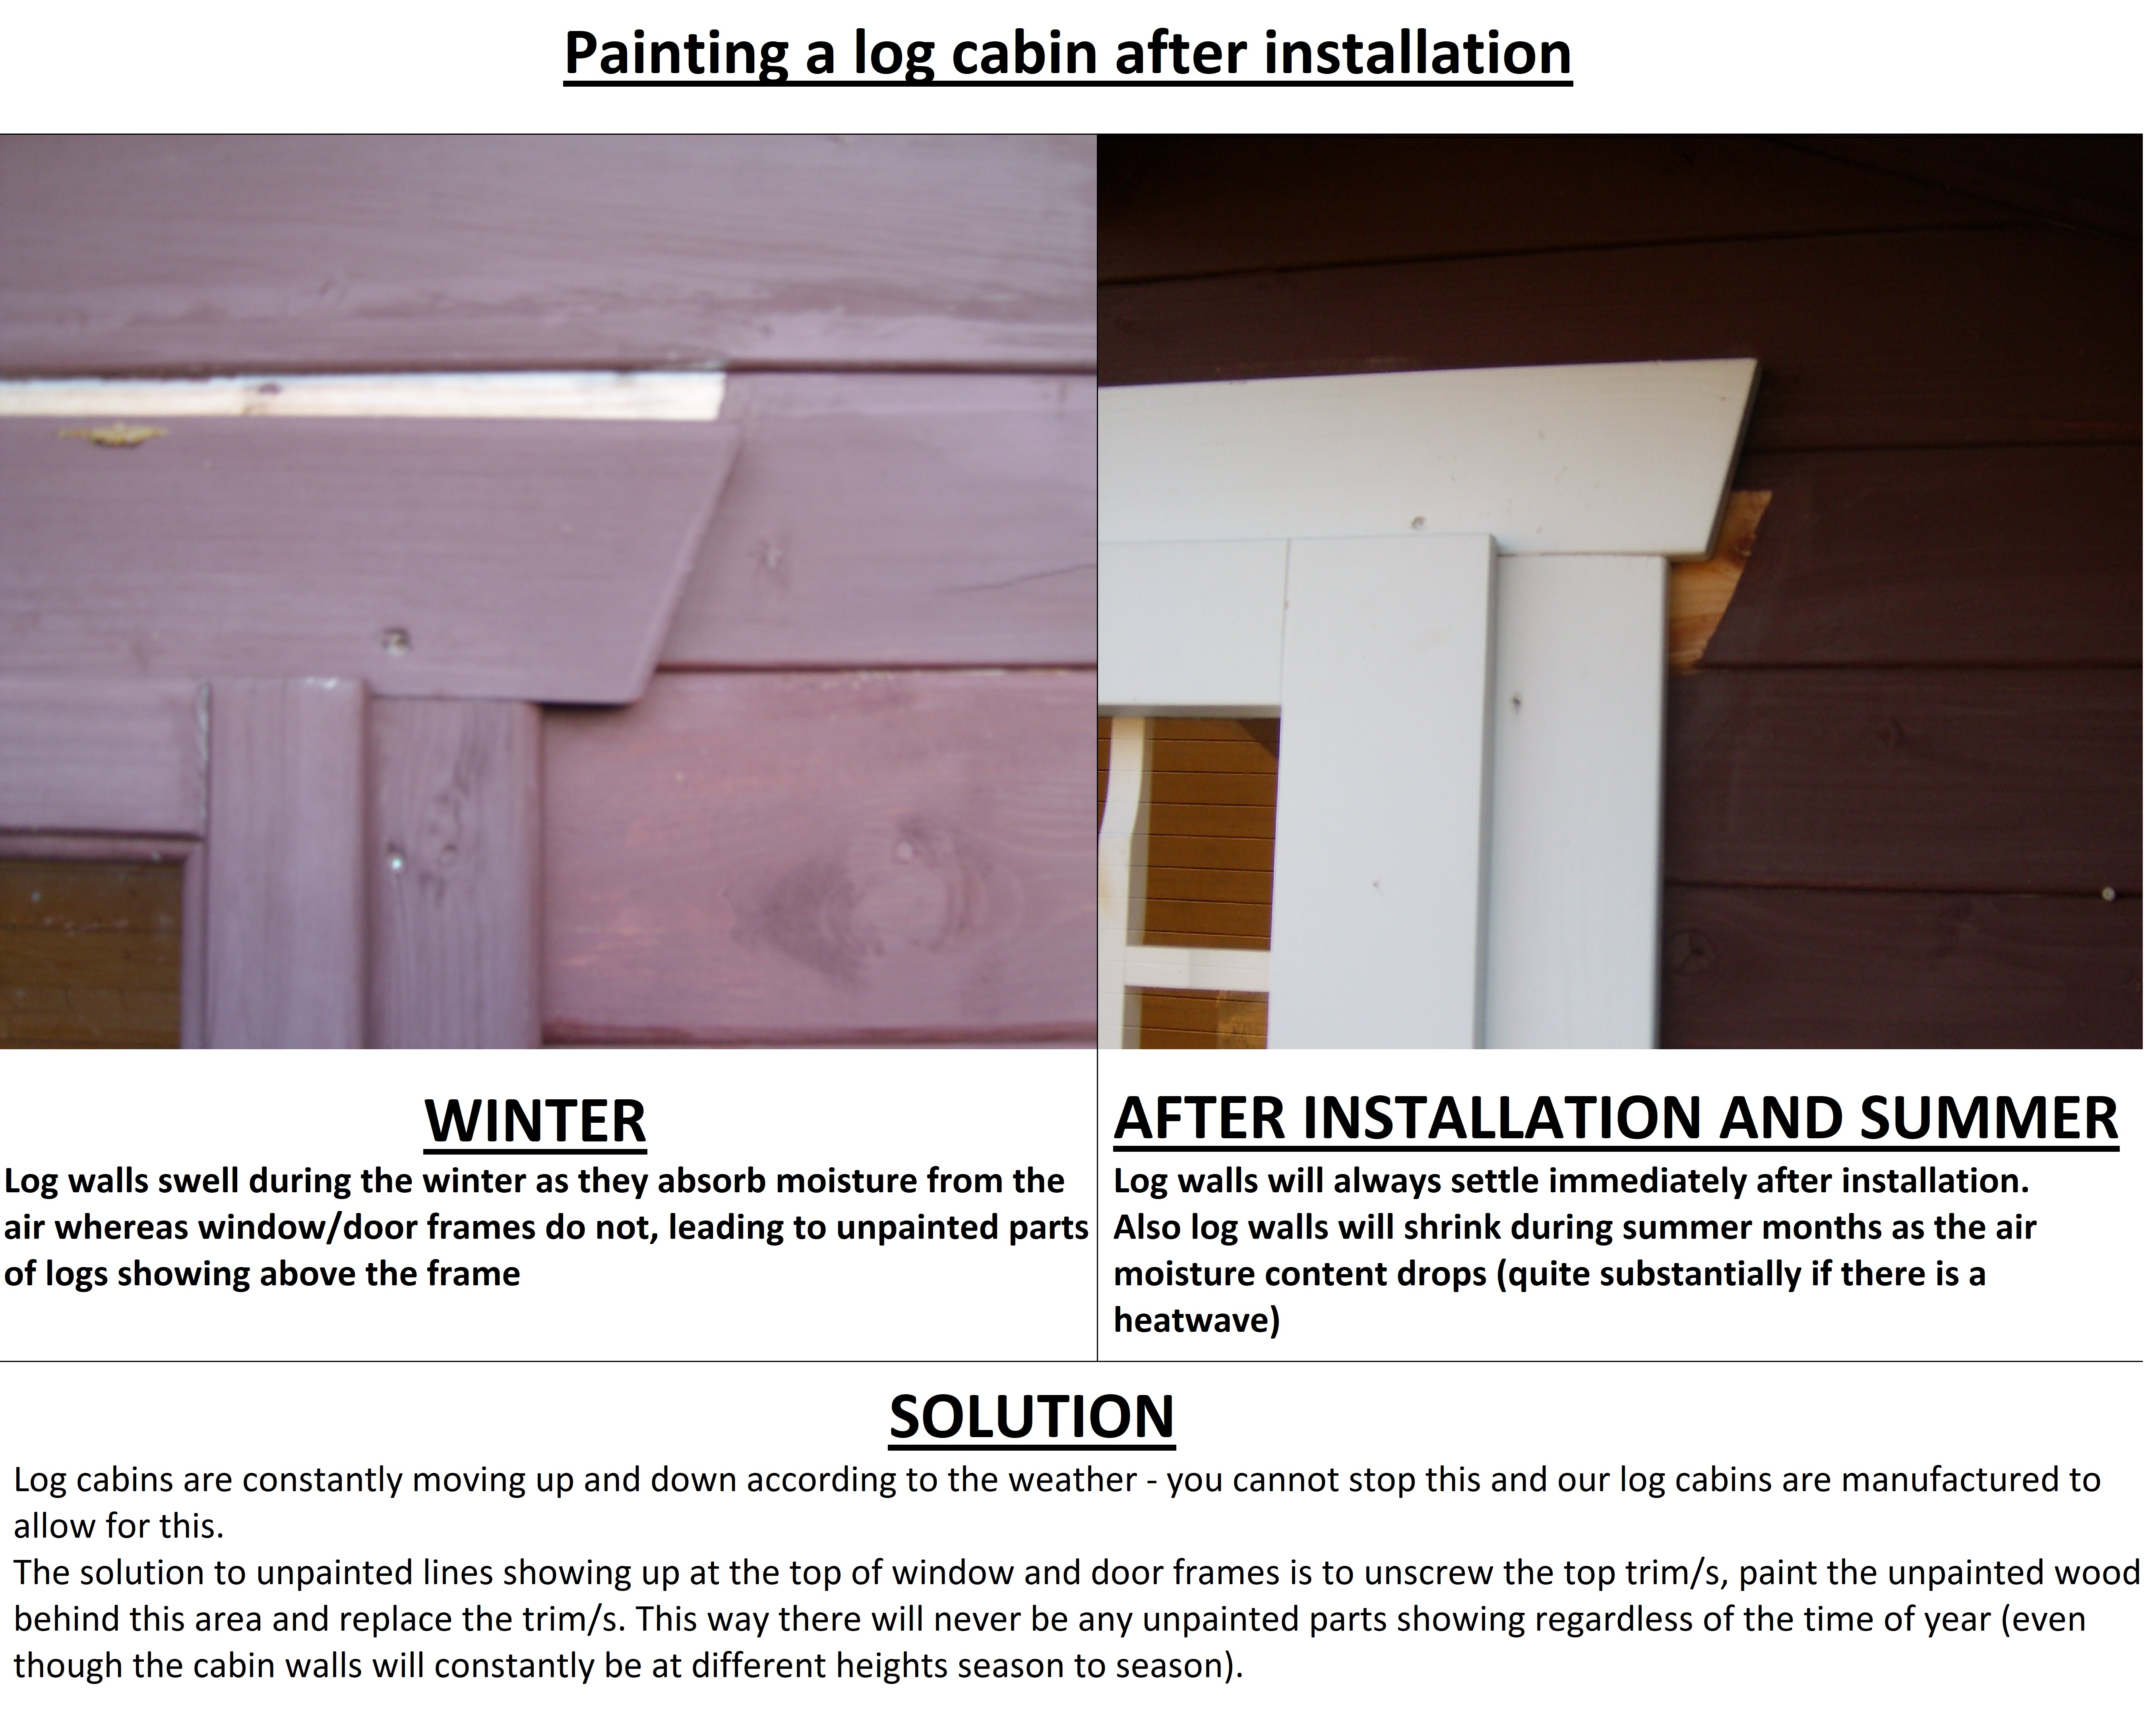
As you can see from the photos above, fixing anything too closely above a window or door frame (or through the top trim into the log behind) will cause a problem because this will stop the log above the window settling down and staying in contact with the log below it - all of the weight will rest on the frame instead. Therefore gaps will appear in the logs either side of the frame (as these logs will carry on settling down) plus your windows or doors may start to bind or not work correctly with the extra weight bearing down on them.
Q. Do I need planning permission for a log cabin?
A. Log cabins, summerhouses and timber garden buildings are termed as outbuildings with regards to planning permission and building regulations. Hortons do not offer specific planning permission advice, but these are the direct links to the appropriate easy to follow government website pages -
Planning permission - http://www.planningportal.gov.uk/permission/commonprojects/outbuildings/miniguide
Building regulations - https://www.planningportal.co.uk/info/200130/common_projects/43/outbuildings/2
As you will see from the above links, many garden buildings and log cabins can be installed in your garden without requiring planning permission or building regulations - if you are not sure, you should check with your local council's planning department and building control office.
Q. Do you supply locks and handles as standard?
A. Yes.
Q. Do you include the price of the floor in your log cabin prices?
A. Yes, the price of a standard floor (19mm floor boards supported by bearers spaced every 400mm) is included in cabins by Hortons.
We also can offer you an upgrade to 28mm floor boards, please call us for details.
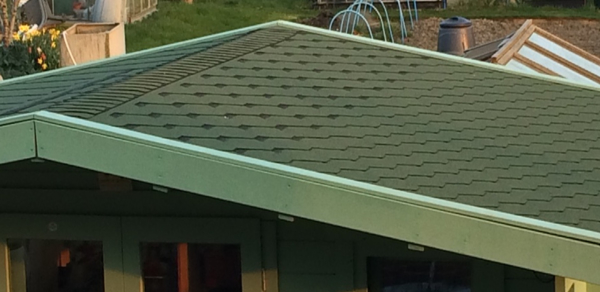
Q. Do you supply bitumen shingles as standard
A. No, our buildings are supplied with a 19mm Roof board and will require a roof covering - this is because we can offer a choice of coverings for customers to choose from. We recommend heavy-duty bitumen shingles or recycled rubber roofing slate for a more authentic heavy duty finish, but we can also supply other types of roof covering. Please call us for details.
If an underfelt is used (whether breather membrane,ie Tyvec, or a bituminous felt) we suggest that it should be dressed down and trapped behind the fascia boards & barge boards and trimmed accordingly, then the top roofing material is laid as described in the appropriate fitting instructions. This means that should the top roofing material fail for any reason (high winds etc), the underfelt should be held securely all round providing a secondary waterproof layer.
Q. How are your log cabins made and what finish can I expect?
A. Our buildings are made with softwood timber, which is a natural material which will change (both appearance and
dimensions) with differences in temperature, humidity and general weather conditions.
The timbers used have been kiln dried to 16 - 19% and then planed before cutting or machining.
This means the timber finish is not comparable to the smooth finish of plastic, steel or glass.
You will need to understand the nature and finish of the external timber we use in our products- they are not the same as the
internal "prepared" joinery timbers in your house for example, and are not intended to be. Timber can be totally unpredictable with how it splits or cracks, which can happen in a very short periods of time- it will swell and/or contract which results in stresses in the grain causing splits or cracks in the timber. Sometimes they can be deep or wide (called shakes or cracks) which can appear unsightly but they are to be expected (especially so if left unpainted / untreated during hot weather). Once the straps have been cut and the timber unpacked, the lengths of timber will be un-restrained, therefore the building should be built as soon as possible. Any timber yet to be used should be stacked flat and protected from direct sunlight to avoid any excessive warping or twisting of the timber. During the build, door and window frames should be installed as soon as possible, these will hold the non-interlocked log ends in place and prevent them from twisting or warping.
We would expect a competent person to resolve any surface finish problems by filling (using a flexible filler) and sanding to a finish before decorating.
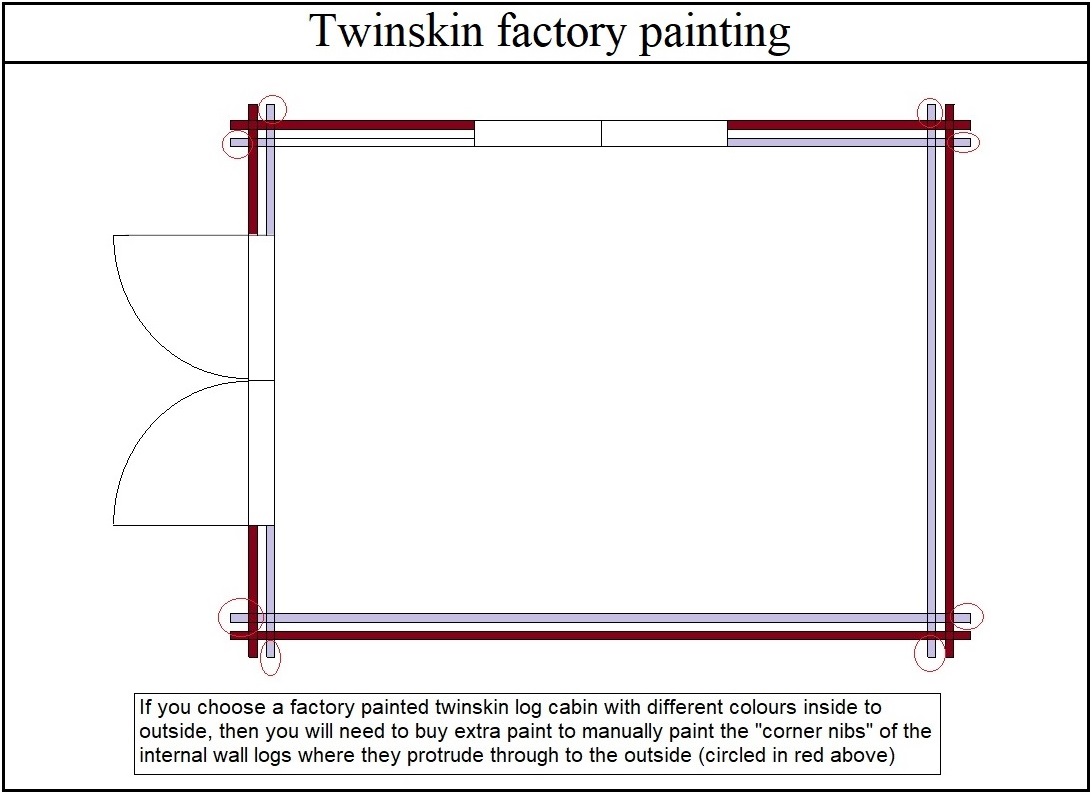
Q. Do Hortons provide a factory painting service?
A. Yes we do. there are various services available-
If you have fully boarded or half glazed doors, you need to apply flexible silicone or flexible caulking around all edges of the solid panel where the tongues and groove boarding meets the ledges and stiles of the door frame to stop rain water running down between the T&G boards and the door ledges, thus penetrating into the rebated joint-
We cannot provide a full factory paint finish to the roof and floor boards because this adds thickness to the tongues and grooves which are already a tight fit, thus meaning that it wouldn't be possible to interlock them when installing the cabin due to the additional paint thickness to each side of the tongues and grooves - these will need to be painted after installation.
If you are painting the building yourself (even if the building has been factory basecoat painted or coated with fire retardant),we strongly advise that you should brush and wipe the surfaces down with a dry cloth after each coat is applied (once dry) as there will be sawdust and other detritus on all areas which will detract from the finish you will achieve. You should also follow the paint manufacturer's directions exactly to ensure long lasting protection.
Q. What happens if I find a damaged timber part?
A. Firstly, as described in your instructions, all parts should be checked and ticked off on the supplied parts lists before you start to build your building. You should check all parts to make sure everything is present and not damaged. If you do find that anything is missing or damaged you should notify Hortons immediately (by email or telephone - we will require photos of any damaged parts). Hortons will not be responsible for any claims for compensation by customers or contractors if you start to build the cabin without checking off the parts lists only to find that the build cannot be completed halfway through because of damage or missing parts.
You should then advise of the best course of action, which is usually very simple.......
There are other steps to make use of your (or the contractors) time whilst waiting for replacement parts - Cutting the (roof and floor) insulation to size ready to be fitted, Boxing out of the window and door frames, Painting of the window and door frames, Painting of the fascia boards, etc.
If you have fully boarded or half glazed doors, flexible silicone or flexible caulking needs to be applied around all edges of the solid panel where the tongues and groove boarding meets the ledges and stiles of the door frame to stop rain water running down the T&G boards and penetrating into the rebated joint-
NB - Hortons provide spare wall logs, T&G (roof & floor) boards and trims in every log cabin kit as standard. We obviously cannot supply a spare part for every item, so we provide the longest parts relevant to that type of item (ie, we will provide at least 1 spare wall log for the longest log in the building - more in larger buildings), which then enables You to cut it down to length should you require a shorter wall log (thus meaning that you don't have to cut a corner notch as the longest log will already have a corner notch at each end as a matter of course). Equally, if you require a replacement trim that isn't supplied as part of your kit, then it is also possible to cut a spare (roof/floor) T&G board down to width in order to make a spare trim (ie a replacement fascia board / window trim / door trim, for example - anything requiring up to 125mm width can be cut in this manner) - You are expected to be able to carry out this simple operation as it is part of the standard fitting procedure for a log cabin roof / floor which requires the last board of each run to be cut to width to fit the gap that is left, as stated in the instructions. Non-structural items, trims and other items where joins would be invisible are not always supplied in one long length in our kits (because they are not structural items), therefore it is perfectly acceptable to join shorter replacement parts together when fitting them in place.
Q. Why do you deliver so many spares with your cabins and how do I dispose of them afterwards?
A. Although we hope that no damaged or unusable parts are delivered with your cabin, inevitably with so many individual parts it is a possibility. In that eventuality customers would not want to wait days or even weeks (depending on the parts required) in order to build their cabin. Therefore, even though it does cost us quite a lot to send these extra spare parts, we feel that it is a much better and safer solution to send extra parts with every kit.
NB - If you are having your building installed (by our installers or a builder), then please do not dispose af any materials until it is finished and you have signed the building off. You may think you are helping by tidying and disposing of what you think are spare parts, redundant parts & pieces or rubbish, but they may actually be parts required to finish the building. If we need to buy/supply replacement parts that have been thrown away, then you will be liable for their cost.
Not forgetting everything is wrapped in weatherproof polythene wrapping as well which also needs to be disposed of (or made use of - these are large sheets of polythene and can be very useful as tarpaulins).
Customers often make use of the spare parts supplied by making them into shelves etc or use it for fuel in their open fire or wood burning stoves (the timber is kiln dried and burns very well and efficiently). However, if you cannot or do not want to make use of them, then a simple trip down to your local amenity tip is a common way of getting rid of it. Failing that, you can follow this link (https://www.hippowaste.co.uk/hippobag/) where you can order a bulk bag waste collection service (some parts may need to be cut in order to fit them into the bag or if your cabin is being installed, then our installers can cut any long lengths down to no longer than 1m such that they will fit). We can also order this waste collection bag for you, but please be aware that we would also need to charge an additional admin fee as well.
Q. I have sap running down my cabin wall, what do I do?
A.Timber is a natural product and sap pockets occur naturally within the timber. Machining the timber takes the surface off all sides to give a smooth finish, but this can open a sap pocket up. Depending on the orientation of the sap pocket, it may mean that the sap will start running down a wall.
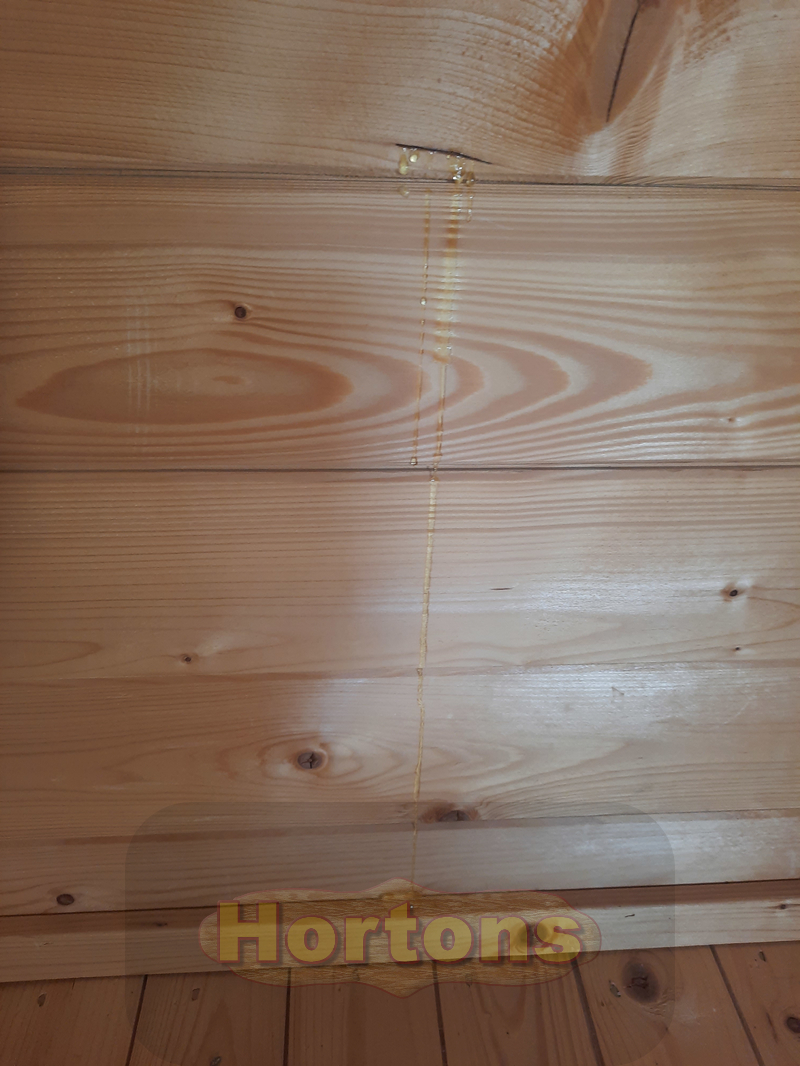
There is no alternative but to let the sap pocket empty itself but there is a simple solution which should help you. You can stick some masking tape to the wall directly in the path of the running sap (if you catch it early enough as you want to stick the masking tape to dry timber). You can then divert the flow into a suitable container to stop it flowing all the way down the wall and onto the floor (by sticking the small container to the masking tape as well). If this is during the summer, it will empty itself much quicker than in the winter. However, the winter can actually help you!...Wait until a very cold morning - the sap will be almost solid (a bit like candy). You can get a sharp implement, insert it under the sap and it will simply snap off! Whichever method you use, you can use white spirit to clean the surface off afterwards.
Q. What site conditions are required if I employ Hortons to build my garden building?
A. All Hortons log cabins and garden rooms can be supplied and fitted, the installers will require the following-
Q. What skills and which tools do I need to build my Hortons Building and/or carry out ongoing adjustments/maintenance?
A. We would expect a customer who intends to build one of our buildings to be competent at DIY. ie at least capable to carry out a construction task, you require more than the skills to fit a shelf - it is a mini building project and should only be tackled by somebody who is comfortable undertaking such a project.
You will require basic joinery equipment for both our Easibuild framed sheds and our log cabins (some elements in our building kits are supplied as standard sections and/or lengths which will be required to be cut to size during installation).
In addition to our installation guide, nails and screws, you will need:
Q. How do I indentify the parts delivered in a Hortons log cabin kit?
A. The cabin kit comes in pallet(s) which are stacked and packed to make them square for easy transport, not in build order. The very first job is to unpack these pallets and stack them close to your base, keeping all like parts together so that you can count them , check them off against the parts lists (provided with the plans and instructions) and also to make it easy to find the appropriate parts when you build you cabin.
The wall logs are all identified by the code (as shown on the elevation plans) which is written in the corner notch detail or on the end of the logs. They are also listed in a table on the plans against their measurements and shape as well (so they can still be identified without the code being written on them (ie. if it gets smudges or damaged such that it becomes illegible).
All other items can be identified by using the factory packing list which shows the number of pieces, cross-section size and length of each item - some parts do have codes written on them, but not all). Some items can look similar, so you should take extreme care to count and accurately measure them to identify the parts by referring to the above tables and factory packing list when initially unpacking the kit, stacking them separately to easily find them later on when building. (HINT - stack them so they are all flush with each other at one end, that way it's easy to find certain length pieces without having to sort through and measure all of them each time you look).
Q. Can I book a date for my delivery and installation at the time of ordering?
A. This is not possible as we can only offer estimated time of arrival to our UK storage yard at that time - we import from our European factory which involves international hauliers, ferries and customs checks, all of which can cause delays for various reasons -
All have happened in the past and all of which are out of our control. Therefore we need to wait until your building arrives in our yard to ensure that we can keep to the arranged dates of delivery to your property. Upon your request, we are happy to keep you up to date with the timings of your order as things progress.
Q. Do we guarantee a date when the installation will start and finish?
A. We cannot offer any guarantees, only estimated guide times - but we will obviously do our best to keep everything on schedule. There are a number of factors that come into these logistics, including but limited to -
We will not be liable for any costs you may incur from a delay in either starting or finishing the installation - You should always allow plenty of spare time if you have arranged for other trades (electrician, plumber, landscaper, etc) according to our estimated start/completion dates.
Q. What precausions should I make if it looks like it might rain during the installation?
A. If it looks like it might be torrential rain, then it would be wise to delay the installation. But if it's just a few showers then it is just a case of keeping the timbers (and you and your tools!) as dry as you can.
The only major thing that would help is if you have ordered our damp proof membrane kit - by its very nature, it is waterproof and therefore water could puddle up inside it until it overflows. But there is a method to get rid of this water without resorting to manual bailing out or hiring a water pump -
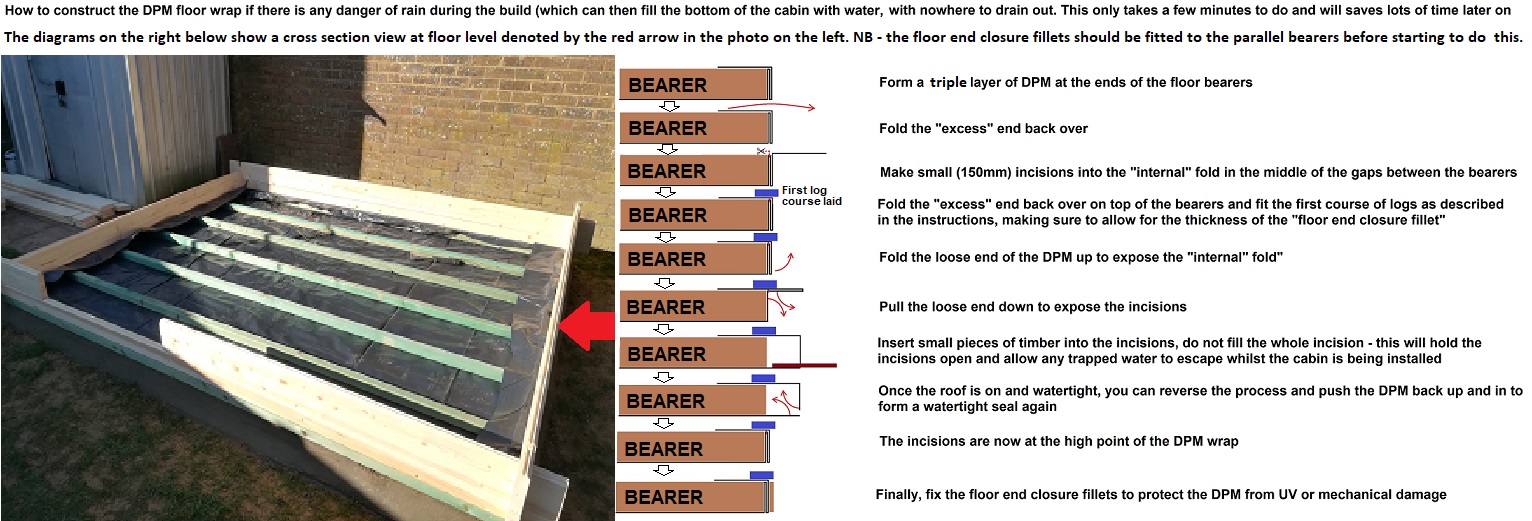
The above method will keep the lying water to a minimum until you get the roof on to weatherproof the building. However you will still need to mop up any residual water beofre laying the floor and floor insulation if you have an insulated floor.
Q. How do I make sure that my base timbers are square before building the walls?
A. It is imperative that the floor bearers (or floor panels) are set square before starting the build the walls - if they are not, the higher you go the worse it gets to such a point that the roof doesn't fit and possibly the windows and doors bind up and don't open. There is a very simple way to ensure that the bearers are indeed square - you simply measure both diagonals from opposing corners and if they are the same then your building is square. If you need to move things to make them square, then the square measurement will be exactly in the middle of the 2 measurements you have already taken.
If you have a corner cabin, then this method needs a further step before measuring the diagonals because there will be a corner missing from your base timbers where the doors are to be fitted. Lay the top course of logs down on top of the bearer timbers (you can temporarily attach them with screws to make sure they stay aligned with the bearers) - these logs will then extend out to a full square (because there is a canopy over the doors making the full square). You now have 4 corners from which to measure your diagonals.
Q. How do I stabilize the short logs between the door and windows whilst building my cabin?
A. You have 2 choices - either slot the windows and doors into place and fix a long temporary batten across the back of them, build the remining wall up and the final log across the top of the wall will slot into the window and door frames and stabilize them. The alternative is to remove the rear architrave from the first window, slide into place and then re-fit the architraves. This then gives a slot for the short logs to house into without falling out. Do the same with all of the joinery and do not forget to equal out the gaps. You should have about 5-10mm gaps up each side of each frame. There will be a very large gap if you push the logs into a tight fit.
If you have a twinskin, you can build the short logs up either side the the timber balk within the wall ans use the meatl fittings supplied with the kit to hold them in place (it is also possible to fit these short logs after the walls are fully complete).
Q. How do I stabilize the door and window frames if I don't screw them into the wall logs?
A. As explained in our installation guide, window and door frames should not be fixed to the wall logs in a log cabin because the logs need to be allowed to move up and down freely throughout the year, otherwise you will get gaps forming between the wall logs as they will be held up in mid air by the screw rather than sitting down onto the log underneath.
Q. I have upgraded doors and windows - how do I fit them?
A. Upgraded doors and windows are very easy to install - you only need to fix4 trims to the inside and 4 to the outside (this forms a U channel for the wall logs to fit into and be free to move, as all log cabin wall logs must).
A. As with timber joinery, uPVC windows and doors cannot be fixed to the wall logs. Hortons have a unique system to fit them using a "sub-frame" which forms the flexible junction between the uPVC frames and the wall logs - you will be sent the installation guide for this if you have chosen this option. One point worth noting is that the uPVC frames are made to a certain tolerance, as are the subframes, which can be a tight fit in some cases. If this is the case, there are a couple of easy ways to make it easier to install them. The first is to loosen the corner screws holding the subframe together, place the uPVC frame in place and then tighten the subframe screws such that it pinches in around the frame. If there isn't enough space for the uPVC frame, it is possible to plane or sand the leading nib on the uPVC frame. It is quite thin and easily planed or sanded with a belt sander as it is only a few millimetres thick.
Q. How do I make sure that the roof purlins are straight when I nail the roof boards?
A. You build the cabin up to and including the purlins. You then tack temporary roof boards to brace in the middle of the run of the roof (front and back) - Offer this temporary roof board at one end and mark off where it crosses each purlin to make sure that the spacings remain the same when you fix it in the middle. Only remove the temporary roof boards when they get in the way for fixing the permanent roof boards.
Q. Why don't you add insulation directly on top of the roof boards in an insulated roof?
A. Hortons have a unique roof insulation system designed specifically for Hortons log cabins. Everything is supplied in small pre-cut pieces which are nice and light and therefore easily handled on site at height as can be seen in this video -.
We designed this system for many reasons-
Q. How to fix the roof panels in your corner log cabin
A. Every corner cabin roof has been temporarily fitted at our factory before being packed and sent. You should follow the plans and instructions which show the sequence and order they will fit in. The first crucial stage is to make sure that the top course of logs are exactly square - you can simply measure the diagonals to check this. Log cabin walls can easily "wander" out of square during the build, so just because your floor is square, it doesn't necessarily mean it will still be square at eaves level. If you do need to push or pull the walls to make them square again, but it doesn't stay in place when the pressure is released, then use some spare timber/s to fix across the corners and hold everything in place (fix in such a way that they won't hamper the fitting roof panels as you don't want to remove this brace until the roof is fully fitted).
As stated in the installation guide, you should only secure each panel by just 1 screw at the top to start with (straight down through the top of the roof panel into the ridge directly below - it is wise to drill pilot holes to do this as the screw are quite big and could split the panel timbers) until they are all in place and fit nicely. You can then fully fix the panels into place - 1 screw in each corner of each panel into the top of the wall logs below, and then more screws along each edge (the fixings should be no more than 800mm apart).
Q.How do I fit felt shingles?
A. Our felt shingle installation guide is within the resources section at the bottom of every page on our website. You will also see how to fit the fascia boards (timber and uPVC) on this page.
Q. I don't seem to have enough felt tiles to cover my log cabin roof
A. Square pattern felt shingles should be fixed such that the new row of tiles starts flush with the top of each slit cut of the previous row. This makes them very easy to keep them in straight lines without having to measure each course - once you have a straight first row then all subsequent rows will also be straight and at the correct spacing. If you choose to overlap the tiles more than this, then you will run out of tiles.
Our hexagonal pattern felt shingles are not a uniform colour across the whole roof but are supplied such that they show "black shading" along each row in order to give a 3D effect (the correct tile spacing is achieved by lining up the bottom of the tile being laid flush with the top of the cut-out of the tile on the previous row). Therefore if they are overlapped too much such that the black shading is not visible then you will run out of tiles. The following picture (supplied by a customer) shows the incorrectly laid felt shingles on the bottom half of the roof (no black shading) and then the top half being correctly spaced once the mistake was realised (black shading visible) -
NB - each tile strip should be fixed with 4 clout nails (1 just in from each end plus one just above the top of each slit cut / diagonal cut-out)......BUT these nails should also go through the top of the previous row of tiles as well, therefore each tile strip effectively has 8 clout nails holding it down. This in combination with the bitumen strips printed on each tile to bond them to each other (once they are warmed by the sun) means that you will have a very long lasting roof. Felt shingles can be vulnerable to flapping or even lifting and detaching themselves in very strong winds and/or exposed locations if the tiles haven't been laid long enough for the bitumen strips to bond to each other, even if they have been laid correctly - this is not deemed as a fault (of either the tiles or the person that fitted them), but as "Force Majeure" and out of our control (see terms and conditions 13.7). It is possible to play a warm air gun (not a naked flame) over each of the bitumen strips to make them tacky such that they will stick down although this is not standard practice for their installation - this is not included if you have opted for our installation service. However, it is certainly possible to do by yourself or another contractor during or after they have been fitted.
Q. Do Hortons supply and fix guttering to buildings?
A. Yes we do supply or supply and fit guttering to our buildings - Our website advertises prices for eah building for both options. These prices are for a straight run for each eaves of the building (1 run fwith 1 downpipe or a pent or hipped roof or 2 runs with 2 downpipes for an apex building). However, there are so many possible combinations of layouts that we can only display these standard prices. If you need an alternative gutter layout then please contact us with the details.
NB - Flat roof Lugarde and Woodpro buildings are supplied with short integral downpipes onto which you can slide your own standard 68mm gutter downpipe to channel the water wherever you require (water butt, drain, soakaway, etc)....
Q. Do Hortons supply and fit electrics in buildings?
A. Our installers are not electricians, however they are able to quote directly to "first fix" your electrics under the guidance of your electrician (run wires within the building so they are hidden within the ceiling, twinskin walls or framed walls and floor, NB - this includes for wires only - no fittings / pattresses will be installed and none of these wires are connected to the mains supply or tested - this will be the "second fix" carried out by your electrician).
Please ensure that it is noted on your paperwork at the time of order that first fix electrics will / may be required, and you will need to give at least 48 hours notice that this will definitely be required. Your electrician will need to be present on the first morning of the installation to provide a wiring diagram of how he wants the wires to be routed and also to provide plenty of the correct reels of wire required (neither Hortons nor the installers will provide the cable).
This will then save time and money for customers as 1) the installers are not held up by the electrician and charge accordingly for their time waiting for the electrician to do what is required before they can carry on building and b) the customer is not having to pay for an electrician to be on stand by for at least a whole day, possibly a lot longer, and only work for a fraction of that time as and when required.
Q. How to fix the floor boards in your log cabin
A. Once the building has been weathered in, it is safe to lay the floor without danger of it being exposed to the elements. Use the same principle as used with the roof, ie. start at one end and work towards the opposite wall (2 x 60mm galvanised nails at each junction with the floor bearers), always checking that the remaining gap is equal at either end of the boards to avoid having to cut a wedge shaped final board to finish. We do not recommend secret nailing the floor boards - these are outbuildings and not generally heated as well as a house (if at all), meaning that the floor boards are subject to much more extreme changes in temperature and moisture hence they are more likely to move over time. This means that they need to be strongly fixed as described above - secret nailing will not be strong enough and will probably work loose. If required, use floor board clamps (can hired from a tool hire shop) or floor board ratchet straps (can be bought or hired) to make sure of a good tight finish between the boards. Always try to lay any boards that are not quite straight between 2 straight boards, this will help to hold them straight over time, or you can cut the board in the middle of the curve which will dramatically reduce any gaps (this may not always be required because some cabins are supplied with shorter floor boards that need to be butt-joined on site rather than in 1 long length - this is the case with houses where most floor boards are supplied in random lengths and are cut and joined as appropriate, there is nothing wrong with this method of laying floor boards).
Floor boards can be laid either way up (V joint showing or not) - there is no set way to lay them. Therefore if You have requested your cabin to be installed, it is Your responsibility to advise the installers if you have a preference as the installers will not change them or make a free re-visit to change this after they have been fitted.
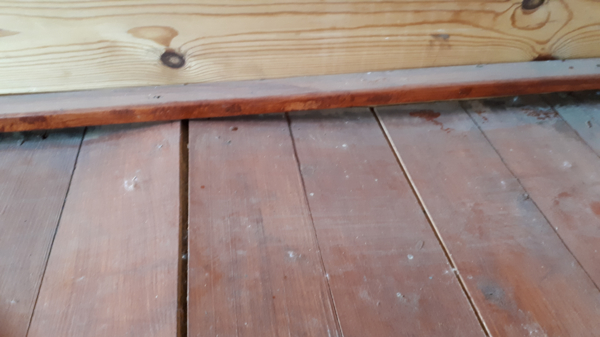
NB Always allow at least an 8mm gap between any wall and the floor boards to allow for expansion. If no expansion gap is left or if you use floor clamps in an unheated building (or even clamp them too tightly in a heated building), then they could buckle up -
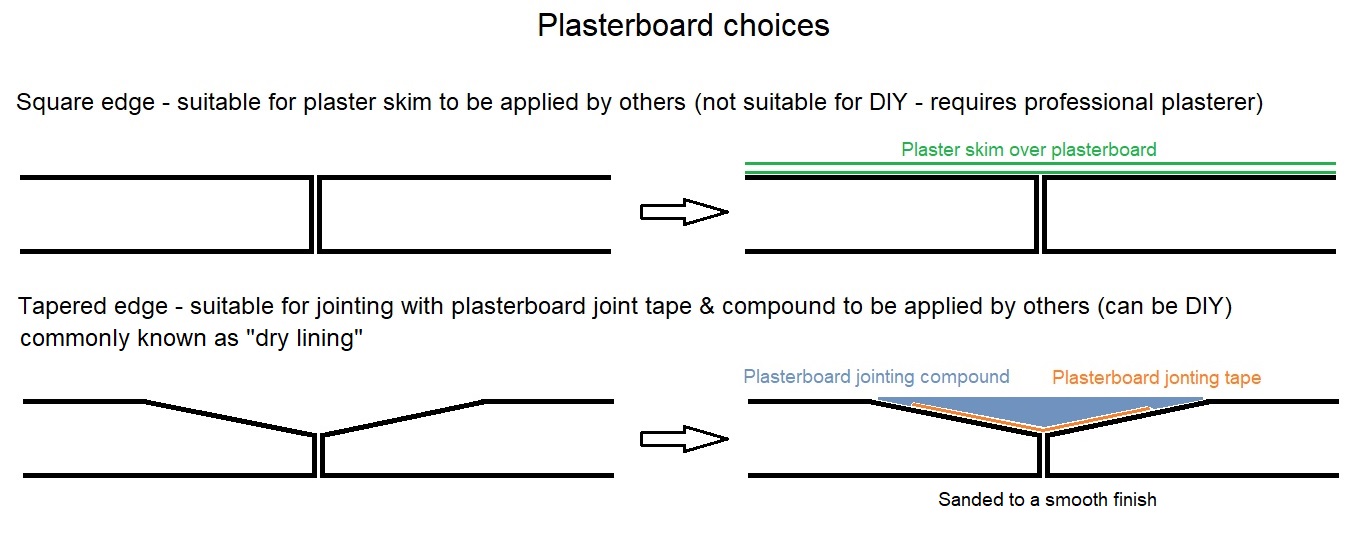
Q. What options do you offer for lining Hortons Easibuild framed buildings?
A. We offer a number of standard choices, plasterboard, moisture resistant MDF and tongue & groove timber boarding (TGV).
NB - Hortons do not undertake plastering or taping & jointing. This should be by others (ie, by the customer or a contractor employed by the customer) (tapered edge plasterboard will be supplied as standard, customers MUST inform Hortons if square is required at the time of ordering). All options will still require full decoration after installation.
Q. What type of base is required for my garden building?
A. The base can be a concrete slab/raft foundation or paving slabs (as long as they are bedded onto a suitable sub-base) or a timber platform - both / either option can be quoted for on request. It is essential that the base is exactly level - otherwise the higher up the building you get, the worse it becomes to the point where it is no longer possible to make the parts fit. If there are peaks and troughs across the base (ie undulations less than 2mm) this can lead to a bouncy floor and windows & doors not working properly). It will also need to be large enough to receive the building including any posts or a veranda - the floor bearers should not be cantilevered off the edge of the base, nor should the building base be at a different level compared to where posts or verandas are to be sited.
We DO NOT recommend oversized bases - they only provide a shelf for rain water to catch on and flow under the building, and also a hard surface for rain to hit and splash back against your building (this will almost certainly cause issues in a few years time). Please ask us what size your base should be (ie. a 3m x 3m building does NOT require a 3m x 3m base).
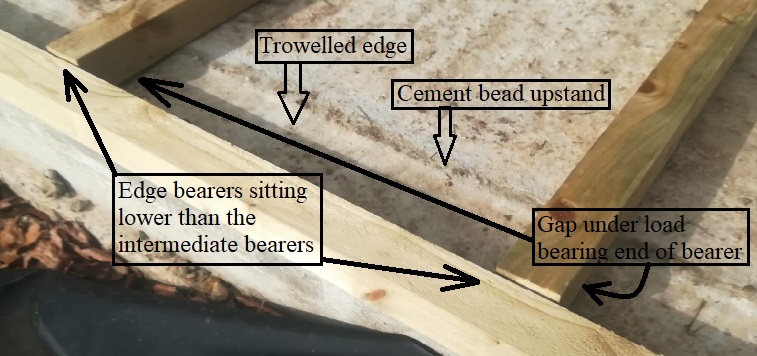
Concrete bases should NOT have "trowelled edges" under any circumstance (a small 10mm pencil rounded corner is acceptable). This is because a trowelled edge not only produces a ridge of concrete (ie, a cement bead upstand which varies in height across the base) about 100mm in from the edge but also depresses the edge of the concrete such that it can be up to 5mm lower than the main area of the base, which therefore means that there will be gaps under the floor bearers when they transition from the higher to lower trowelled edge areas. This would almost certainly lead to bouncy floors and bouncy walls (because the bearers they rest on are actually in mid-air and not directly supported by the base at all).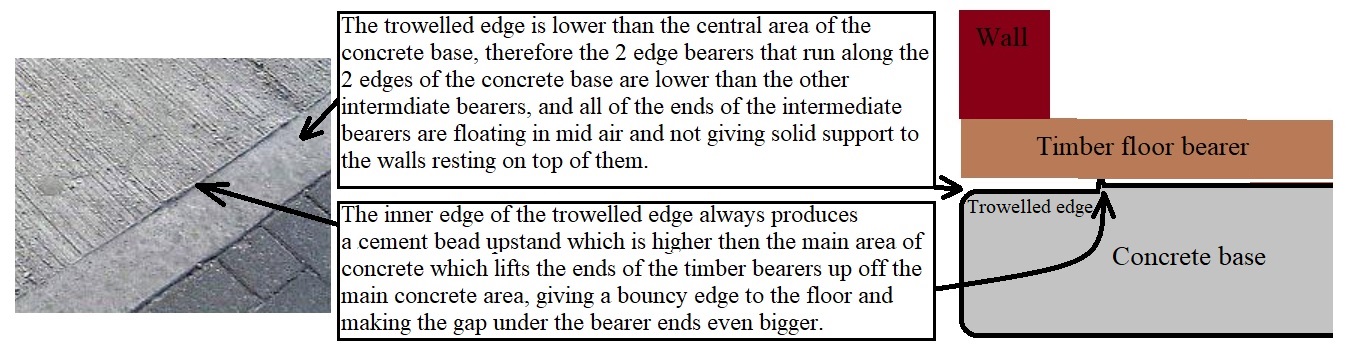
There is one immediate reason why our installers will NOT build on an uneven or unlevel base - the parts will not fit properly leaving gaps in the building, doors and windows wouldn't even open unless remedial works were carried out on site (our installers do not carry specialist woodworking equipment with them in order to do this) and glass may break if the frames are not installed in a true, square and level wall - all of which means both we and our customers will not be happy with the "finished" building.
We do NOT ever recommend using "packers or shims" under the building - the installers do not carry "packers" with them nor would we ever recommend this as a long term solution for a bad base.
Looking slightly longer term, if the building is built on an uneven or unlevel base then although the windows and doors may work initially, over time your buiding will settlte down to the levels of the underlying uneven/unlevel base, meaning that your doors and windows may start to bind and locks will not align (there is only around 3mm of clearance on a door or window sash, so a base that has an undulation of over 4mm means they will definitely not work once the building has settled down). The settlement of the building will also start to stress the roofing material which would lead to the roof eventually leaking.
Although customers would be very disappointed if the building cannot be installed on the pre-arranged day/s and may try to persuade the installers or our office staff that it should be installed (just because there was another building on the base beforehand, this does not mean that it is still true, flat and level - the base could have easily been out of level or uneven when originally laid or possibly it may have moved, settled or cracked over time), the fact of the matter is that we cannot do so for the reasons stated above no matter how inconvenient to all involved.
However our installers will always try to suggest various solutions to you, which may involve extra costs, but then you can be sure that your building will last for the long term and that you will be happy with the result.
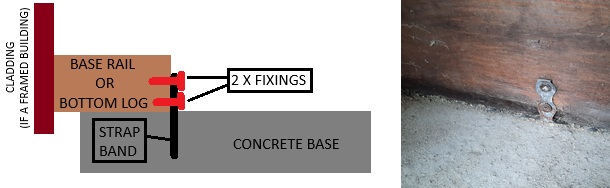
NB - please note that we don't fix buildings down into a concrete base - this is because they are nearly always close to the edge of a base, and if you try to drill down and fix close to the edge of a concrete base there is a very high chance of it "breaking out" (even more so with freshly laid concrete). This then becomes a huge issue regarding who is responsible for the cost of repairing it . Buildings should be fixed down into a base by customers or their nominated contractor after installation. There are various methods of how to do this, the best method is to bed the anchoring points (metal strap-banding) into the base when it's being laid so that you won't need to drill into the base at all....
Q. Is anything else required if I lay a concrete base?
A. It is always recommended that you lay a damp proof membrane (DPM) which will stop any rising damp and/or prevent any of your base timbers lying in any water that may get on top your base (if your base is oversize, then water will edfinitley travel underneath your floor) - both will (eventually) cause your base timbers to rot and possibly also cause dampness inside the cabin itself (the lying water under the floor could evaporate in hot weather, then the humid air will rise up through the floor into the building) and possibly result in condensation issues (it has happened!).
Q. I can't decide whether to lay a concrete base or use a wooden base
A. Both methods are valid as long as they are done correctly:
A. There is nothing wrong with using a timber surround to contain your concrete (known as shuttering or formwork). BUT if you intend to leave this formwork in place as a permanent feature (usually for aesthetic reasons), then DO NOT built your garden cabin such that it rests on top of both!! The reason for this is that the timber will dry out in the summer and get soaking wet in the winter. Consequenly this timber will shrink in the summer, leaving the top edge lower than the concrete surface, and conversely it will swell in the winter and therefore be higher than the concrete in the winter (and therefore very rarely at exactly the same height as the concrete). This can can cause all sorts of problems with your building (including windows and doors not working correctly at certain times of the year because the building and/or frames are being ricked / skewed causing them to bind up etc. The higher the timber, the more this differential will be - this photo shows a really bad combination of a concrete base with a tall sleeper wall along the front, tapering down along the sides and short at the rear. This means that each timber side will be at a different height (compared with the concrete) during the winter months -

Softwood timber can easily swell 3% during the winter compared with it's summer size (meaning the base shown above will easily 10mm higher than the concrete level on the tall side!). Therefore any building on top of this base will be at all different levels around the edge of the base, but not only that - the timber surround will be higher than the level of the concrete thus giving a bouncy floor as well - the worst of all worlds! If doors or windows are anywhere near this junction in your building, then the frames will inevitably be pushed out of square and won't work properly.
Log cabin joints rely on the external stain / paint to keep the rain water from ingressing into the corner joints (by capilliary action). But if the cabin joints are constantly being flexed / skewed or ricked then this external weatherproofing with also be tested to the extreme and in some cases they will fail and let water by. An early warning sign for this is dark patches appearing inside the cabin at the corners.
Do not forget that even Tanalised timber is not expected to last more than 10 years, which is a much shorter lifespan than your garden building.......it will rot and fall away from under the building. Unsurprisingly, this would be a very expensive operation to rectify this when the building is on top of it and showing signs of subsidence (due to the timber rotting away around the edges).
There is another disadvantage when using a permanent timber surround if it's going to extend past the wall lines of your building - it provides a shelf to catch rain water and feed it under the building (never ideal) and also it gives rain something to hit and splash back against the bottom of the building (leading to long term problems with rotting the bottom timbers).
Q. How will hot weather affect my building?
A. Extremely hot weather during summer can lead to extreme movement.
Q.What modifications can I make / adjustments do I need to make to my log cabin after installation? *IMPORTANT*
A. Log cabins are built without the use of a vertical framework which would hold the walls at a set height. They are composed of horizontal logs which lie on top of each other and are taller during the autumn/winter. This may also mean that the walls could move in and out of exactly level and plumb - the cabin may be exactly level when installed but then settle down and be slightly out of level, but then also move back into level during the winter or summer months. This is part of owning a log cabin - the walls will definitely move from season to season, but this does not compromise the structural integrity of the building.
The walls are usually 17 logs high and each log can absorb enough moisture during the /autumn winter that they can each easily swell by over 1mm, so the log cabin could well be 17mm higher during the autumn/winter.
Log cabins will take approximately 2-3 weeks for the initial 'settling down' but will take a full year's cycle (Spring, Summer, Autumn & Winter) to fully settle after construction, where the logs could move substantially and the height of the building will reduce by at least 30mm. In most cases, this will cause the door and/or windows frames to move to some degree and therefore causing the doors and/or windows to bind slightly. You can rectify the problem by altering the adjustable hinges to re-align the door and/or casement.
The 'settling down' MUST be allowed to happen without obstruction. This means that you must not fix the window or doors frames into the surrounding logs so that the logs are 'free-floating'.
The coach screws (and washer) that fixes through the slots in one end of each of the wind braces may need to be re-fixed in the middle of these slots once settlement has taken place - NB! not too tightly as this will stop any further movement and could cause issues by holding the logs up and creating gaps (they should be tightened to the point of just touching the timber AND THEN backed off by a quarter turn - you should still be able to easily rotate the washer with your fingers)....
You must not nail or screw the door and/or window frames into the logs. You must not use a gap filler, mastic or thick layers of paint which would 'glue' the logs to the frames. We strongly recommend that you don't fill and paint over any of the internal window or door trim screws as they may need to be removed in order to make adjustments in the future (as referred to later in this answer). If you do need to make adjustments and they are filled and painted over, then there may be no other option other than breaking the trim in order to make these adjustments. Hortons will not be liable to repair or replace these items in such a circumstance.
The consequences of not allowing the logs to move will cause severe problems with the cabin and will result in gaps appearing between the logs either side of the window/door frames.
If your cabin has posts (ie to support a roof canopy for instance), they will have adjustable metal brackets to fix it down to the base. You will need to adjust these with a spanner as the cabin settles down to let the roof come down to match the rest of the cabin and may be necessary to adjust these on an ongoing basis (this may need to be done within a few days of installation as there are a number of factors that may affect this). If you have "plinth covers" around the bottom of the posts, these adjustable nuts may be hidden - these plinths are secured by a screw, so this screw will need to be undone which allows the plinth to be slid up the post in order to expose the nut. Following on from that, if you have ordered our installation service, please note that we don't fix posts down into your base - this is because they are nearly always close to the edge of a base, and if you try to drill down and fix close to the edge of a concrete base there is a very high chance of it "breaking out" (even more so with freshly laid concrete). This then becomes a huge issue regarding who is responsible for the cost of repairing it and also it can stop the building be installed if the base doesn't exist under it any more.
If you have ordered a Lugarde "Prima" summerhouse building, the timber corner post covers (which slide over the aluminium extrusion post) are supplied slightly short in order to allow the building to settle down without hinderance.This is more obvious if you have a canopy extending from the main building as shown in the photo below (the gap is less in the summer when the building shrinks down). This should not be fixed in any way and left to freely slide up and down as required -
NB - if you have ordered Lugarde bifolding doors, these will need simple Allen key adjustment as the seasons change due to the varying amounts of air moisture which gets absorbed by the timber doors (ie, they will swell slightly in the winter and shrink during the summer). If you have asked Hortons to install them, they will be adjusted correctly at the time of installation but it is not the responsibility of the installers to make a re-visit to adjust them again after this point - this is the customer's responsibility.
You must not build stud wall partitions within the cabin that are permanently fixed to the wall logs (you must use sliding fixings or fix through slots for anything that is 400mm high or more - even a mirror fixed midway up the wall) and there must be at least a 70mm gap from the top of your studwork to the underside of the roof and/or purlins - the cabin WILL settle down and therefore gaps will appear between the wall logs, or in the worst case, the studwork framing may even lift the roof off of the cabin causing severe damage to the building. Further severe problems can occur if the studwork is fixed to the cabin at various heights (ie, stepping up into the roof void) as this will cause the roof structure to distort - shaped roofs with hips or valleys will almost certainly leak due to the roof junctions being stretched / distorted (the different faces of the roof will be force in different directions) and breaking the roofing seal at these points.
In some cases, window and door frames may need to be re-squared because of the settling process. You can do this by unscrewing the 2 internal side architraves, re-squaring the frame, i.e. equalling out all of the clearance gaps around the casement/door, temporarily put a wedge in place and then fix a small packer in each corner to stop lateral movement. Then remove the temporary wedges. You must make sure that the packers aren't so tight that they will stop the logs moving up and down because they still need room to move.
If you have an insulated roof, the ceiling boards can shrink after installation, especially in a heated building (more so if they get wet or damp prior to, or during installing them), which can lead to gaps between the boards once they dry out again. These boards are installed in such a way that they can be gathered back in again by simply using a tapping block to respace them locally around the gapped area or, if there are a number of gaps along the roof bay, by pushing all of them together from either end of each roof bay and extra boards introduced into the ceiling structure if required - always leave a small expansion gap if doing this in case the boards swell again (the gable coving may need to be unscrewed and removed in order to slide new ceiling boards in, then replaced again afterwards). If you had your building installed, the installers would not re-visit as this is a very simple task and part of the general cabin settlement rather than an installation fault.
The same principle applies to the floor boards - our floor boards are supplied as kiln dried to between 16 - 19 percent moisture content, but they will always move according to the moisture content in the air (outbuildings are rarely heated to the same amount as a house, and therefore the timber is subject to more movement than in a house.This is caused by the variation in air moisture content - the colder the temperature, the more likely it is that the ambient air will be damp. Hence damp the corners commonly found in unheated/derelict houses)....
a) If the building is going to be heated, then generally floor boards will dry out and therefore shrink a little - hence the reason why nearly all old buildings have gaps between their floor boards. It is possible to use floor board clamps when fitting in this situation - but be warned - if the building is not always heated and the air moisture content within the building increases (in the winter, for instance), then the floor boards will swell and potentially buckle because the standard expansion gap will not be enough to take up this amount of swelling, and in extreme circumstances the floor will need to be re-laid.
b) If the building is not going to be heated, then they will swell during the winter months, hence the reason for leaving expansion gaps around the perimeter (as stated in the instruction guide). In this instance, it is not wise to use floor board clamps.
The floor boards should ideally be allowed to acclimatise for a number of weeks inside the building before being fitted, thereby limiting some of the initial movement that may occur. However, this isn't always practical, and the person fitting the floor boards will have to use their own judgement when fitting them. This is especially true if the boards get wet or damp prior to fitting them - they will swell accordingly and if fitted before being allowed to dry out, this will definitely lead to gaps appearing between them once they dry out again (see previous question above - How to fix the floor boards in your log cabin).
If you have requested Hortons to install your building, please also see point 13 in our t&c's here - https://www.hortonsgroup.com/conditions-of-use
If the building has been supplied with Georgian bars for the windows and doors, these will not be installed unless you have requested the building to be factory painted as they need to be painted before being fitted, otherwise the unpainted sides against the glass will be visible through the glass (not ideal). Therefore these will need to be installed by the customer after they have painted them.
If your cabin has threaded rods inserted in the log ends, then these will need to be tightened as the cabin settles down initially - just finger tight is fine (the cabin as always moving up and down with the seasons, and so there is no point using a spanner as it will automatically tighten again in winter anyway). Be sure that the rod ends are clear from any hard surface underneath them as they must be allowed to move - if it is getting close then they should be cut accordingly (with a hacksaw or grinder).
Please be aware that a log cabin will take a full 12 month cycle to "settle down" (notwithstanding the seasonal movement that occurs with every cabin) - cabins need a full winter and a full summer to allow the cabin to find its natural preferred state.
Q.Do I need to do anything extra if my log cabin is in a location exposed to high winds and rain? *IMPORTANT*
A. For the main, nothing needs to be done. However, if you have doors and windows facing into the prevailing wind then you should make sure that the drip rails above the frames are fitted correctly and that the door cover strip (on double doors) is fitted. In extreme cases, you may need to fit self-adhesive foam strips (1 - 2mm compressed thickness) to the rear of the front vertical architraves - this will stop any rain driving sideways in behind these architraves and drips appearing at the bottom of the inside of the frames. This foam strip is readily available from any hardware store, or we can supply this at extra cost if we are asked to do so at the time of order.
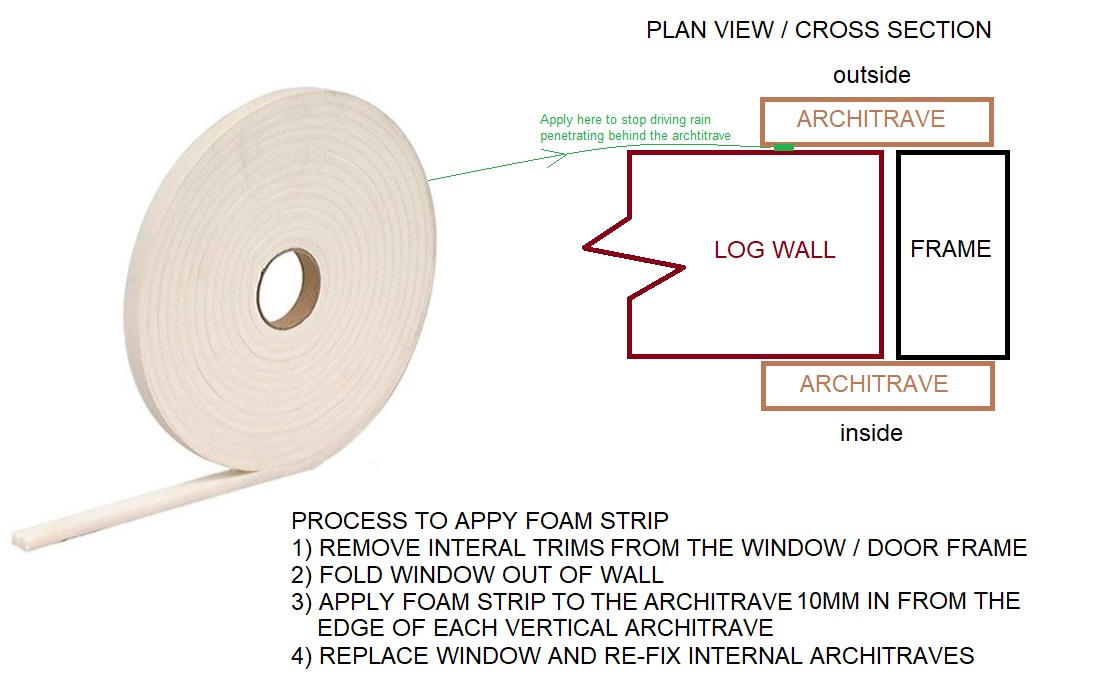
The foam strip has to be retro-fitted as it is not possible to slide the logs down into the frame as this will just pull the foam strip off the architrave - it needs to be compressed against the wall logs to form a flexible but tight joint against the logs. This measure does not mean that the window / door frames are faulty - the very nature of log cabin construction means that frame and/or architraves cannot be fiixed/sealed/masticked directly to the wall logs, it is only very rarely required in extreme circumstances.
Q.Do I need to paint or treat my log cabin after installation? *IMPORTANT*
A. Timber treatments must be applied to the exterior of walls (must be waterproofing - the job of an exterior paint or stain is not just to colour the building but also to protect it AND seal it - the knots and joints need sealing), the interior of the building, including the ceiling and to all exterior fascias, trims, windows and doors. You must ensure that all joints between the wall boards are thoroughly painted (paying special attention to working the paint into all corner joints) such that a waterproof seal is formed between the boards (the timber is the "structure" and not the "waterproofer" - capilliary action will occur if the joints and knots are not totally sealed - the paint layer is the "waterproofer"), there should be no breaks in this seal around the external faces of the building - in extreme weather conditions, wind pressure can drive rain through timber joints, be they vertical or horizontal, and cause dampness inside your building. We advise that a flexible paint is used to allow for any timber movement without breaking the paint seals between timbers (NB - due to settlement of log cabins, this may cause the paint seals around the corner joints to open up, so you may need to re-paint the corner joints after the cabin has settled down, this includes if your cabin has been factory painted as well). All treatments must be applied in accordance with the manufacturers directions. Do not use emulsion internally as it will flake and crack and absorb air moisture to dis-colour into what looks like a damp patch.
If you are painting the building yourself (even if the building has been factory basecoat painted or coated with fire retardant), you should always brush the surfaces down and wipe with a dry cloth after each coat is applied (once dry) as there will be sawdust and other detritus on all areas which will detract from the finish you want achieve. You should also follow the paint manufacturer's directions exactly to ensure long lasting protection.
If you have bought your paint from Hortons as part of your order to paint yourself, this will give you enough to paint 2 coats externally to all walls but not any roof canopies or overhangs. If you want to paint the roof overhangs / canopies then you will need to buy extra paint or stain. There will probably be enough spare paint (or if factory painted, spare touch up paint) left over to paint these extra areas. But we advise that it is wise to save some for re-painting the corner joints after your cabin has settled down (after a few weeks of your cabin being installed) in order to make sure that the corner joints remain sealed.
If you are building your cabin in an exposed rea, then we strongly suggest fitting our column corners which help to protect the corner joints and end grain of the logs. These are very simple to fit -
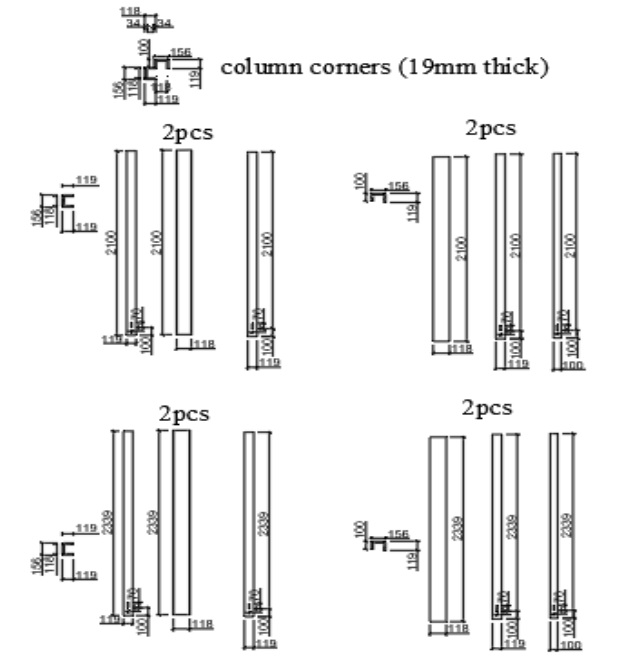
It is advisable to fit the column corners before the roof boards are fitted (but do not fix through the bottom slots until the roof is fully fitted – the weight of the roof will help the cabin settle down and therefore move the fixing point down as well). This is because you can cut the top of them off, where appropriate, with the angle of the roof using the tops of the logs as a guide (no need for bevels, transferring pencil lines, etc). You should fix the roof boards so they finish flush with the outside of the column corners. If you have a regular square/rectangular cabin then all will be supplied at the same length. However, for pent roof cabins there are 2 different heights (front and rear). If you have intermediate partitions then there may be varying lengths supplied depending on the positions of the log ends.
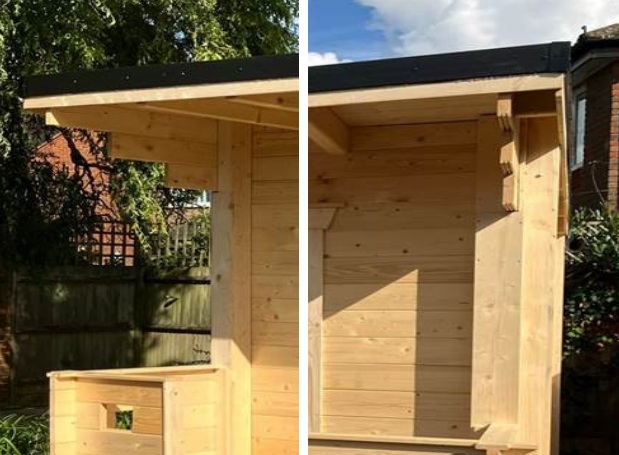
Then they simply slide over the log ends and using the supplied coach screws, fix them to the logs…..The holes should be at the top and the slots at the bottom. The cabin will always settle down, so never fix through the top half of the slots.
NB – do not over tighten the bottom coach screws, they should only be tightened such that the washer can still rotate using just your fingers – this allows the coach screw to slide up and down within the slot.
If you have fully boarded or half glazed doors, you need to apply flexible silicone (after painting) or flexible caulking (bfore painting) around all edges of the solid panel where the tongues and groove boarding meets the ledges and stiles of the door frame to stop rain water running down the T&G boards and penetrating into the rebated joint-
Q.How strong are the veranda handrails ?
A. The handrails / balustrading around the edges of the veranda kit are made from standard interlocking cabin logs, they are not structural elements and are "added on" for aesthetics. Therefore the handrails are not strong enough on their own to be leant against or treated harshly. They can be bolstered by concreting extra posts alongside at regular intervals (at least on the external corners and at the end of each run, ie where the cut out is to walk through), or you can leave pockets in your concrete base into which posts can be inserted for strength. This is not part of the cabin installation service. Alternatively, you can fix a vertical post from the handrail up to the roof canopy (if you have one), which will also strengthen the handrail accordingly (this can be requested to be supplied as part of your cabin kit for a small additional fee).
Q.How do I fix things to a log cabin wall *IMPORTANT*
A. Given that log cabin walls move and settle, it is important to get this right-
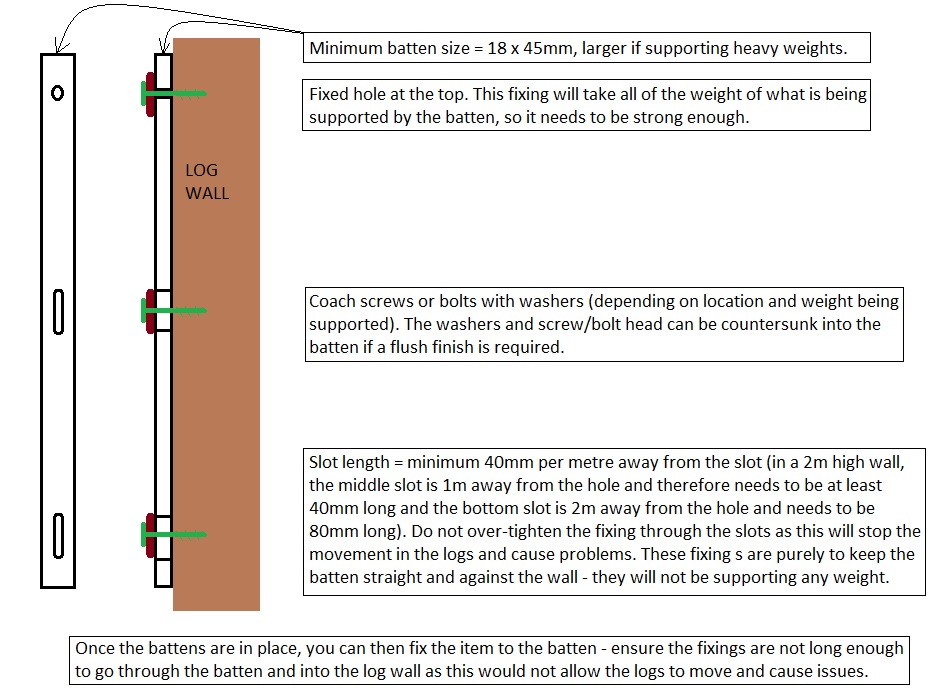
Always make sure that the bottom of the battens and/or the item being fixed to the battens have at least 150mm clearance from the floor as this height will vary through the year (and reduce by some margin during the summer months).
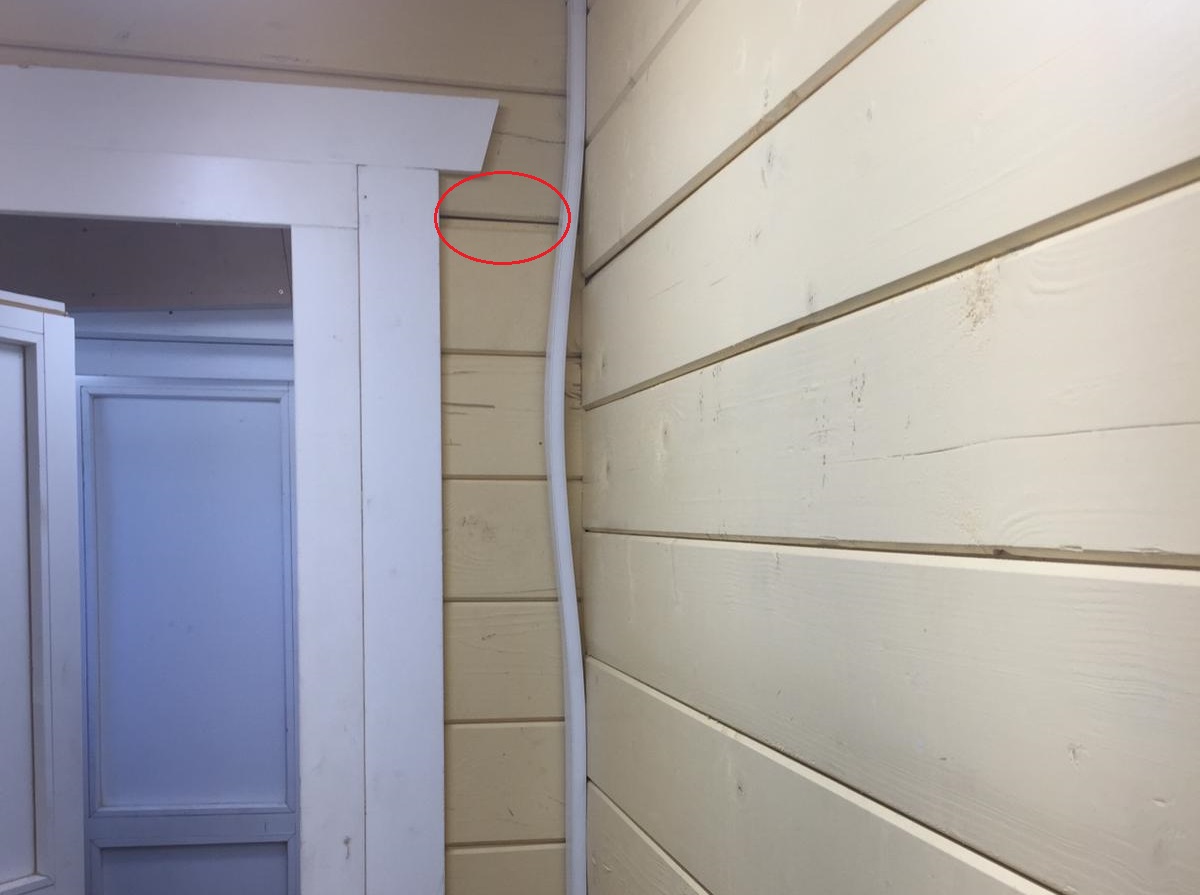
Q. Some gaps have appeared in my log cabin walls level with the top of a window, is it possible to fix it?
A. This is very rare and will only ever happen in very warm dry weather when the wall logs have dried out and shrunk down - It probably also means that the cabin hasn't been treated / oiled / varnished inside as specified in our T&C and FAQ pages (see previous question)? You can usually tell if the timber hasn't been treated / protected because the timber under the removed trims (see below) should be a distinctly different colour and finish to the "seen" part of the frame - if they are the same, then it hasn't been treated. Treating it inside helps to stabilise the timber against drying out and so much (rapid) movement and avoiding as many cracks etc.
The weight of the cabin wall and roof are now resting on top of the window frame, and the logs underneath this have dried and shrunk down away from it resulting in a gap between the logs - Log cabin walls rely on gravity to keep the wall log joints tight - if there is a gap then they are artificially being held up in mid air, they will not float on their own......it is just a case oif finding out what is holding the wall logs up (please also see the section about fitting services at the bottom of this page). You can check for the most common cause around a window or door frame by removing the top trim from the inside of the window (or door) frame. There should be a gap between the bottom of the log spanning over frame and the top of the frame, if not then the log above needs to be notched out accordingly so there is a 10mm gap above the frame).
Q. Can you move a log cabin once it has been built?
A. NB: This reply applies to log cabins only.
It is possible to move a log cabin BUT the following factors will affect the ease of doing so:
Please call us to discuss and we can give you some general advice as there may be many other variables that will affect your particular requirements.
You should also contact your installer for specialist advice.
Q. I have a broken pane of glass, how can this be rectified?
A. If you do need to replace the glass, you don't need a new door but purely to replace the actual glass unit within the door or window (this is very easy to do)-
Please also follow this link - Do Hortons supply and fit electrics in buildings?
Q. Is it easy to install electrical wires and plumbing into a log cabin?
A. Yes. You will need to follow some rules, as below:
a) They are usually quite hot when switched on with nowhere for the heat to dissipate
b) The bottom layer of roofing is designed in such a way that it is free-floating in a horizontal plane (external buildings are subject to extreme conditions which can cause these boards to shrink (in summer when it's warm and dry) or swell (in winter when it's cold and damp) a lot more than you might expect, if fixed permanently they could swell and buckle or shrink causing gaps. They are free floating to allow for periodic corrections to be carried out very easily- they are installed with expansion gaps at either end to allow for expansion, or if they "gap" then it is very easy to push them back together without taking the roof down and starting again.
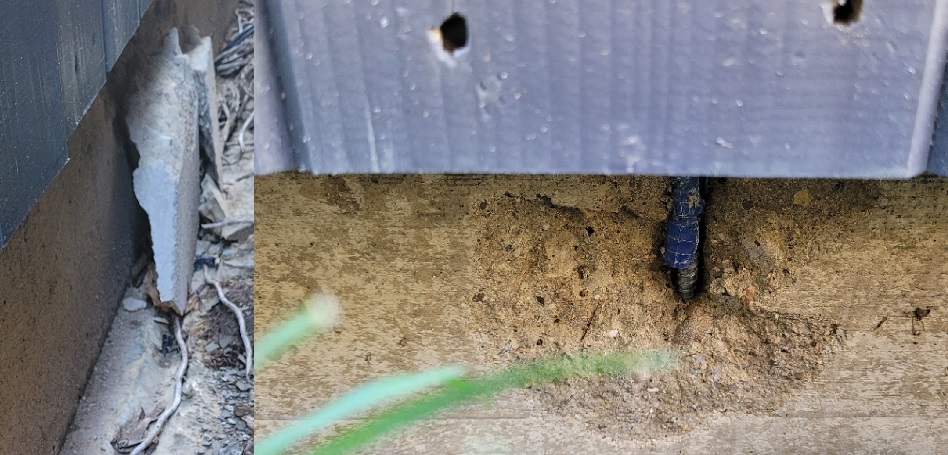
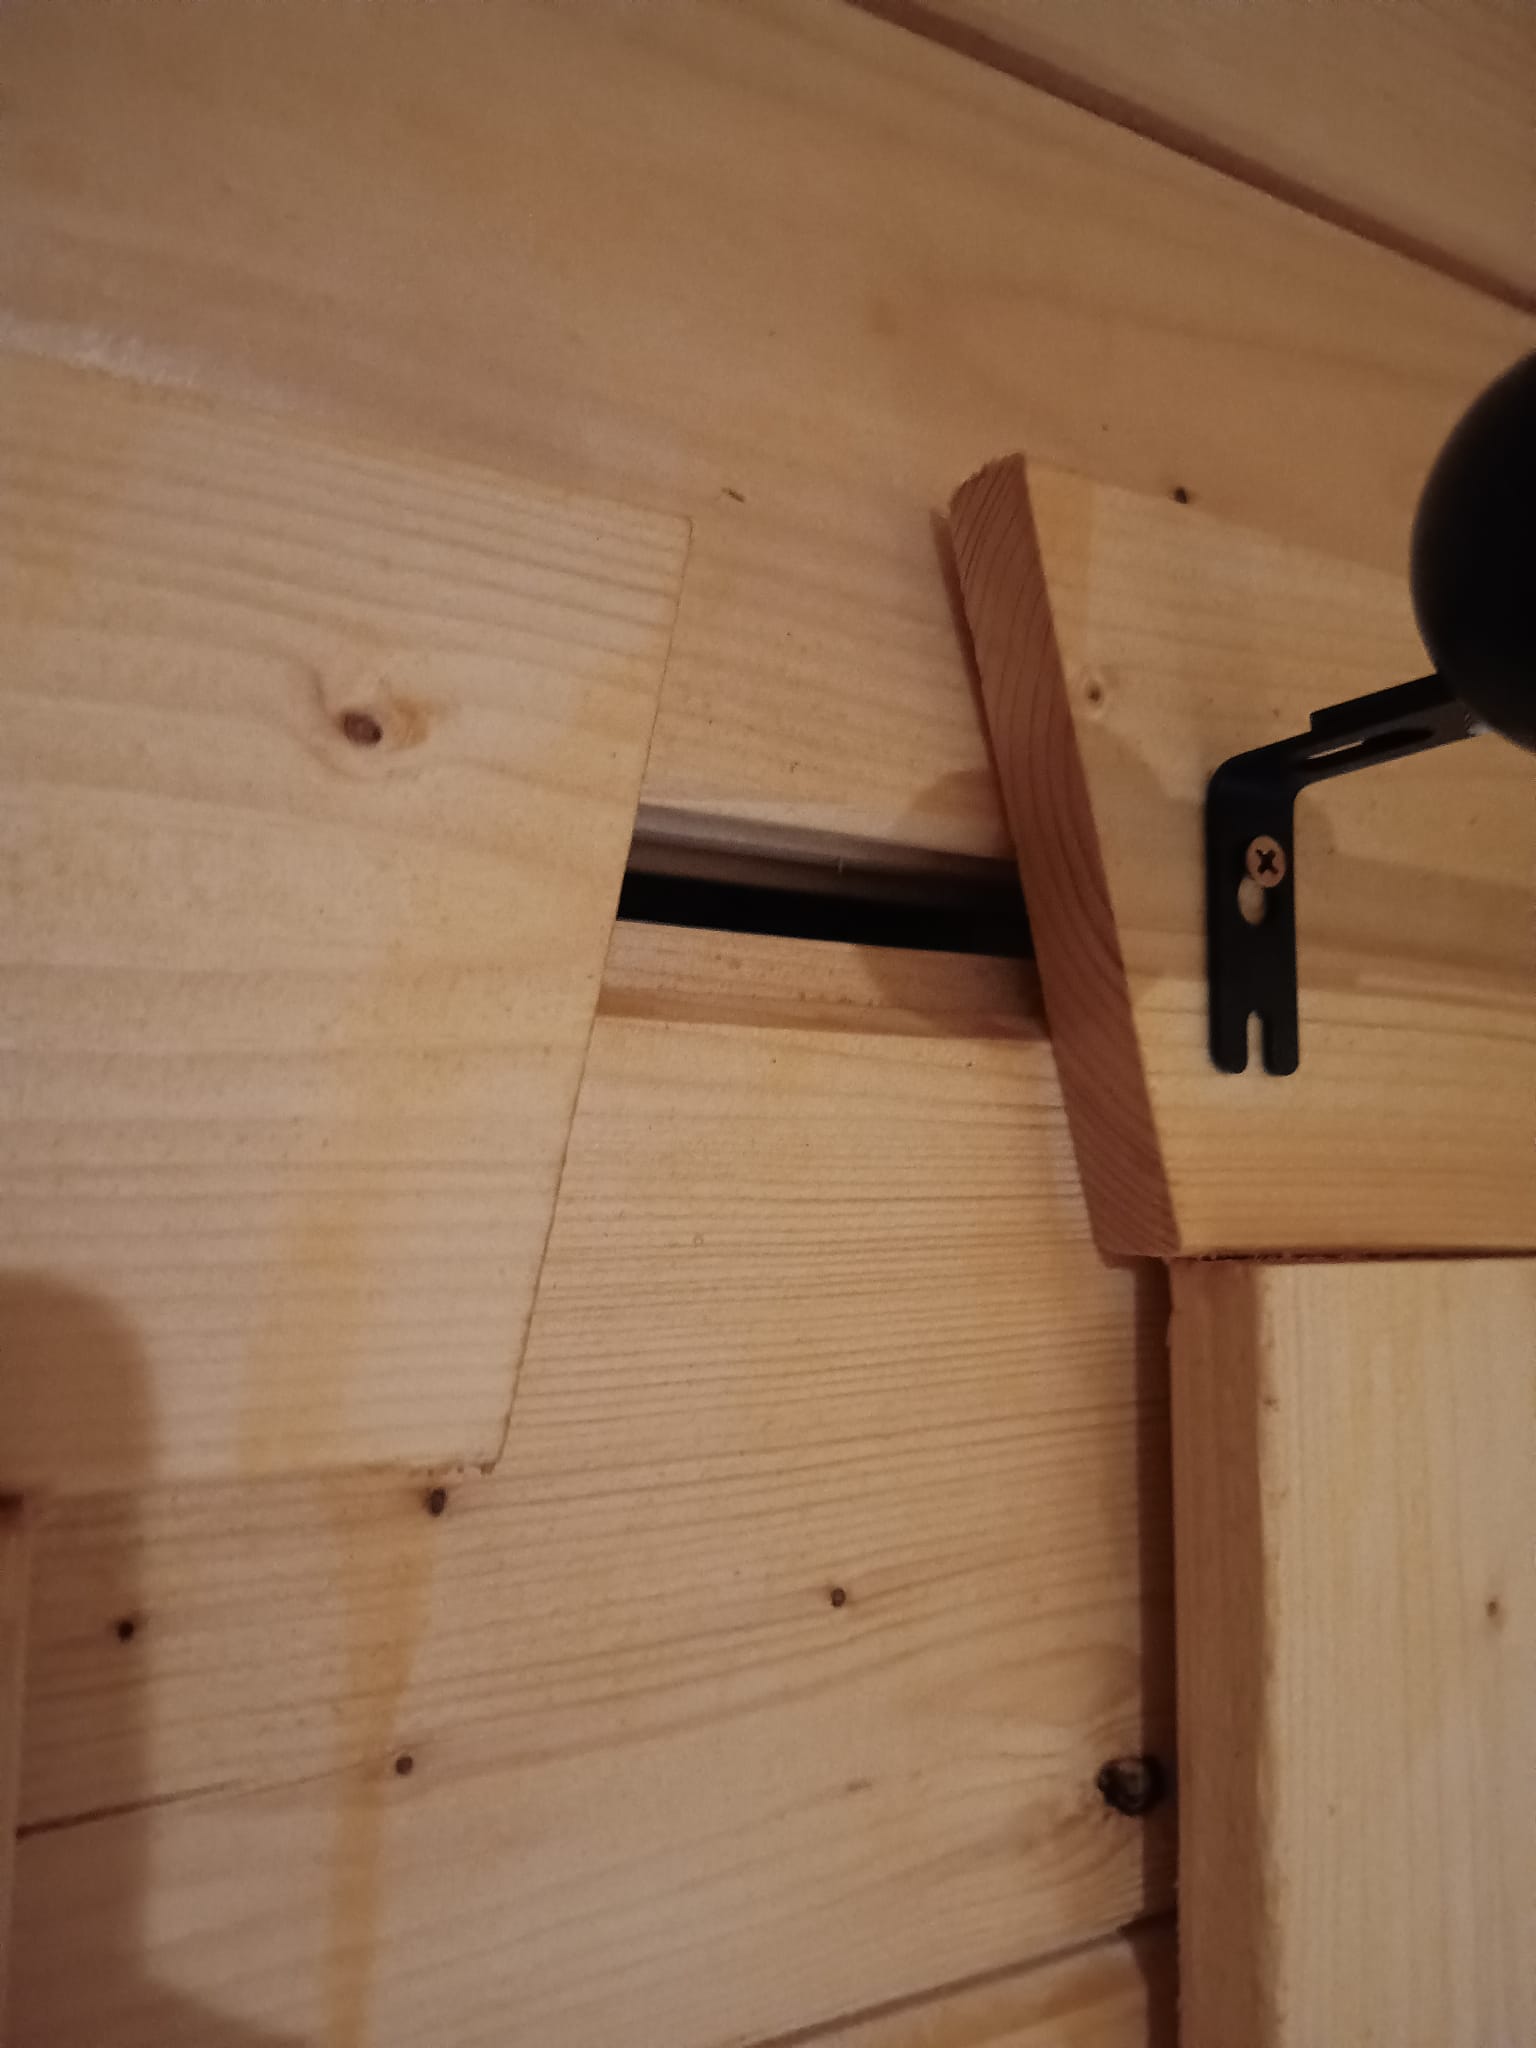
Even small conduit is strong enough to cause logs to gap (as well as bow away from the wall due to the stresses of the cabin settling down)
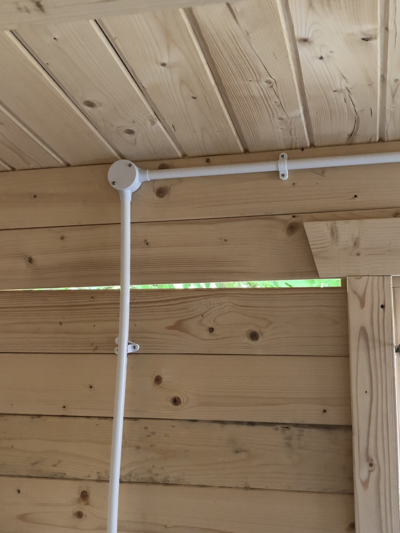
The conduit clips have been released here but the junction box is still connected thus leaving a direct fixed height connection from top log to floor causing the logs to gap. This can be mitigated by using flexible conduit (e.g. commonly available LOflex Galvanised Flexible Steel Conduit for example) using the same method as described below for water pipes, or by using different sizes of conduit to form a telescopic conduit where one piece can slide up and down within the other adjoining piece (making sure that there is enough slack in the cables, and enough room within the conduit to allow for this).
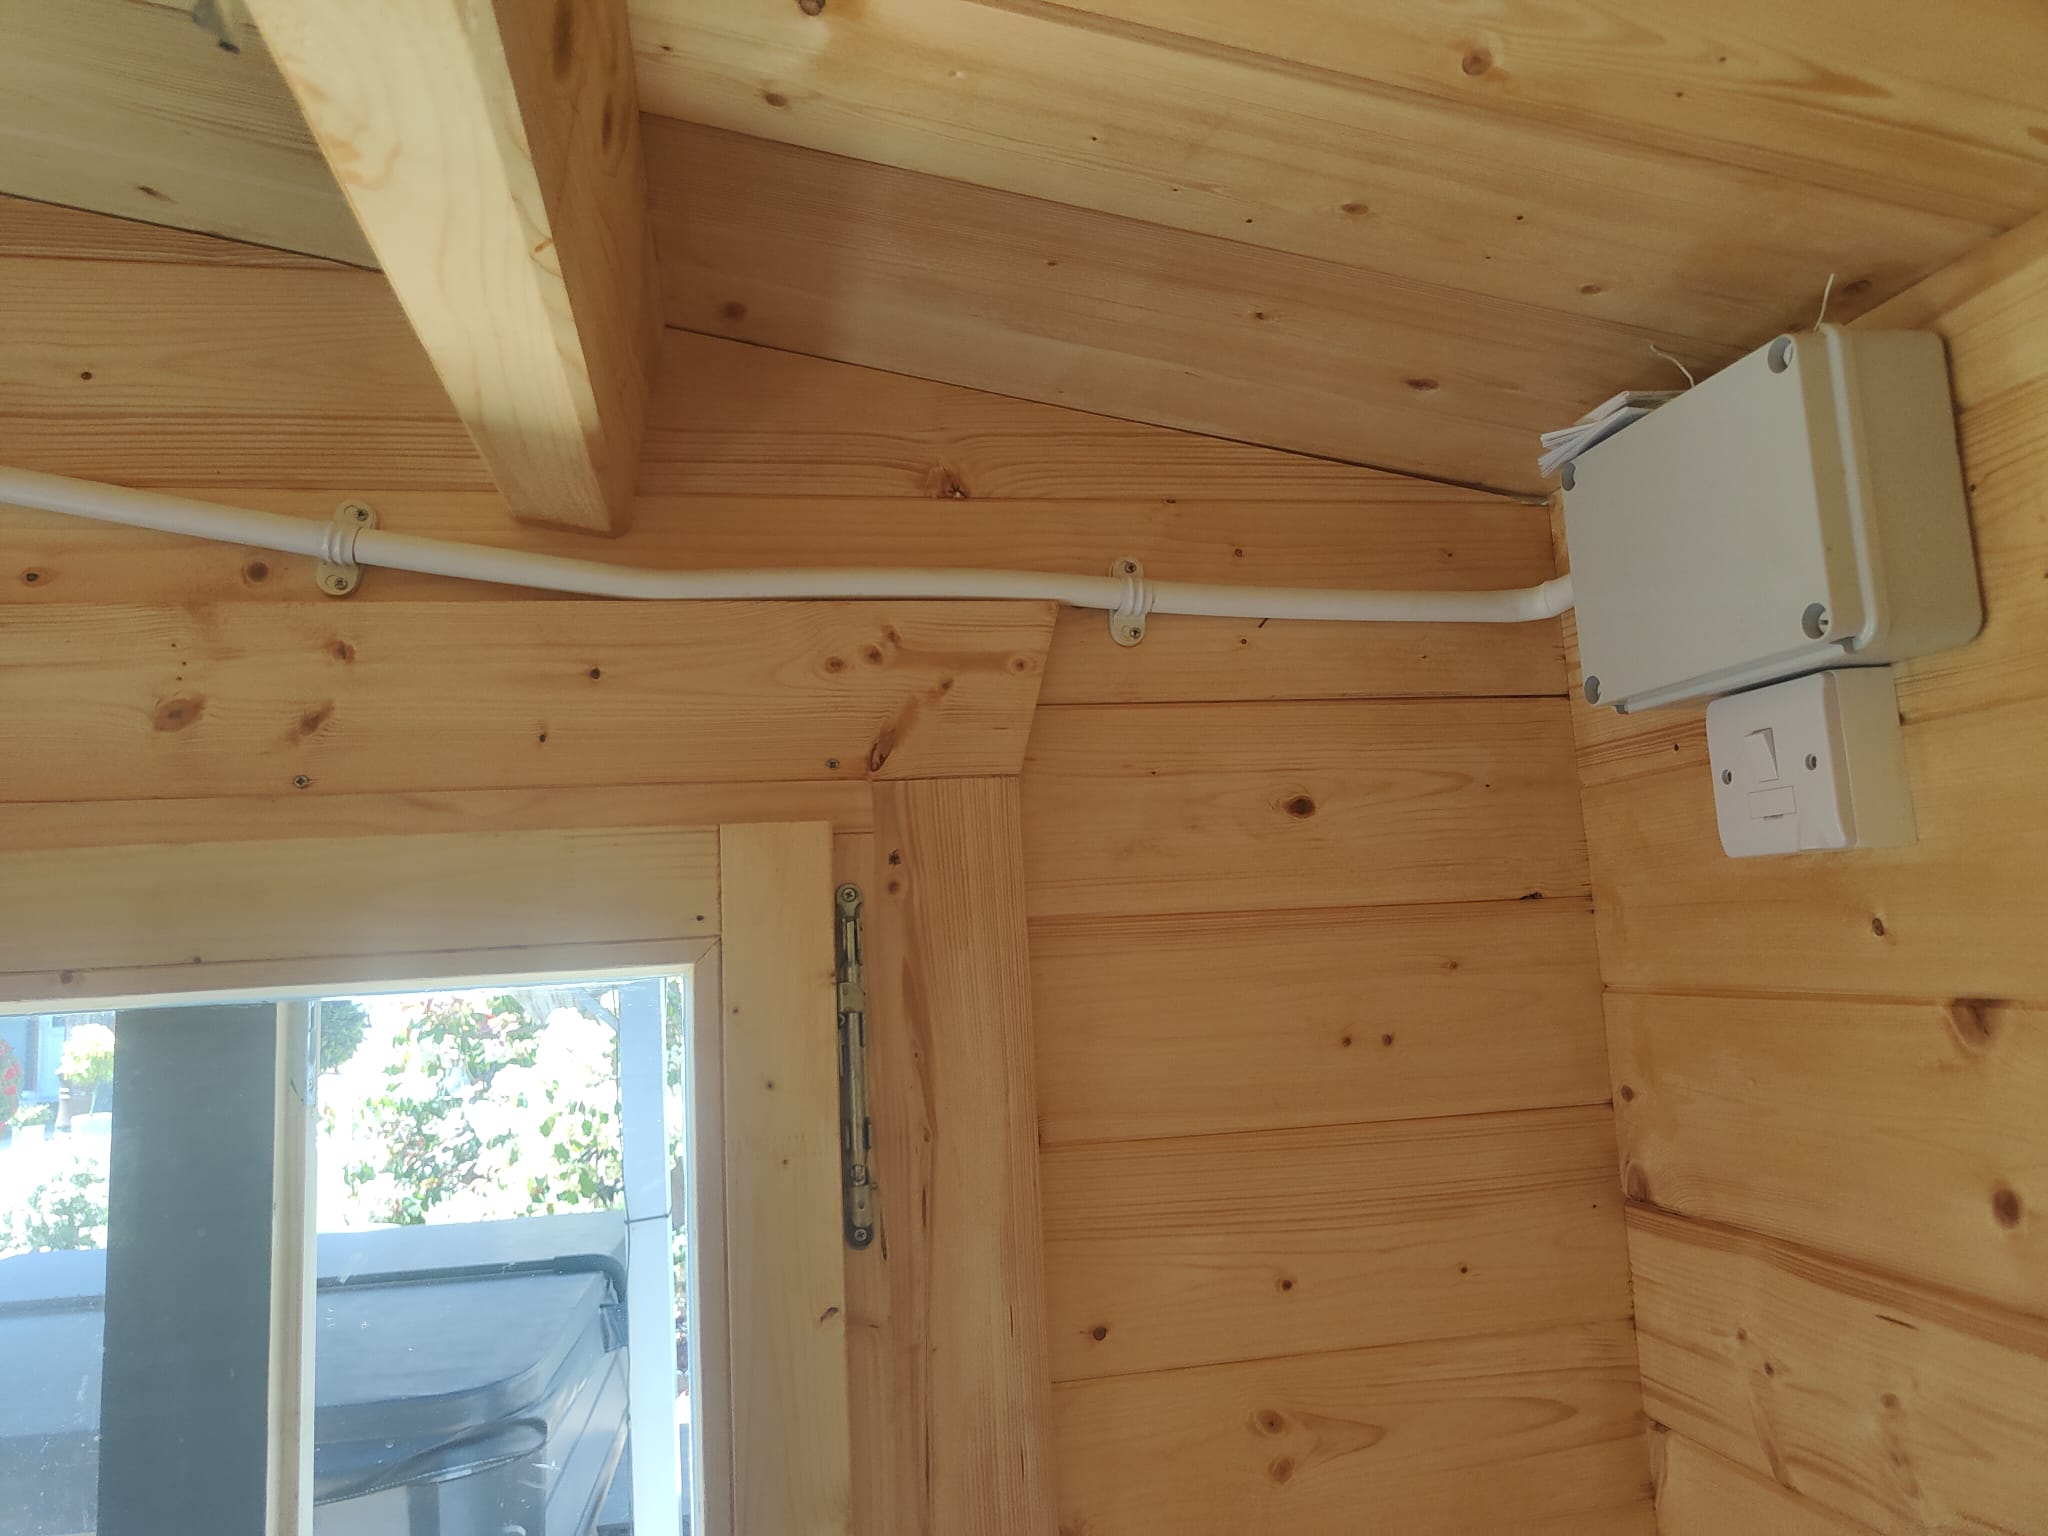
This horizontal conduit is fitted tightly down on top of the window architrave - it is strong enough to hold the logs up and cause gaps to appear, you can see that the conduit is starting to deform in this photo which will only get worse as the logs dry out and shrink down. No conduit (or brackets) should be fitted within 70mm above a door or window frame, this will then give sufficient clearance above for the logs to move down in the summer. The other alternative if there isn't sufficient space to do this is to build the conduit out in front of the frame/architrave in order to "float" the conduit in front of the architrave (but do not fix into the architrave).
Window dressing installations.
It is very important that any screws that fix through window trims and architraves (ie fixings for curtain poles, roller blinds, window shutters, etc) do not go all the way though into the wall logs behind as well - this will also stop the logs from moving and result in similar gaps to those in this photo (all the weight of the upper cabin wall and roof is being transferred onto the window via just a few screws).
Water and plumbing pipes.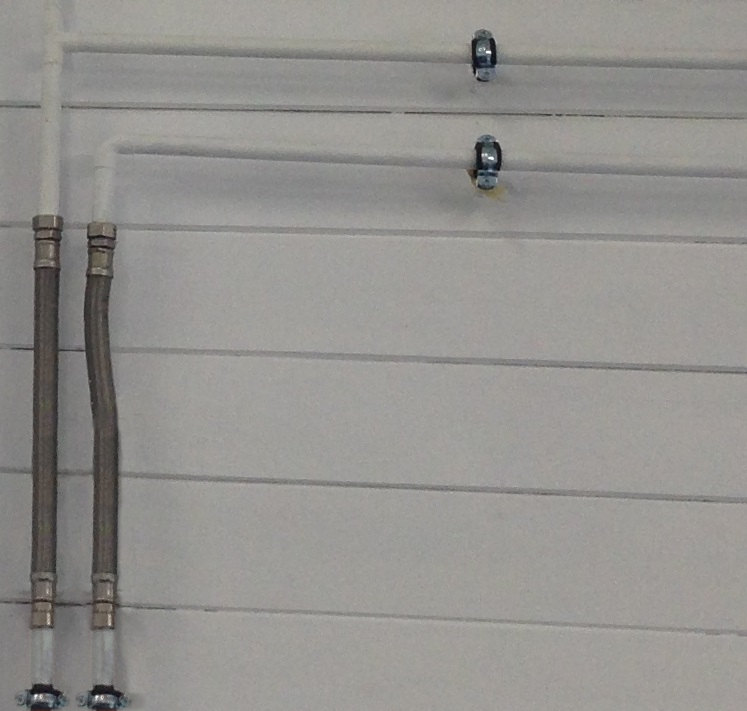
Additional flexible joints and/or "swan necks" need to be used in all vertical water pipes to avoid stresses and strains which could result in leaks and/or floods. The left hand flexible pipe in the photo above has not been installed correctly - it should have a deliberate bend in it (such as the right hand pipe) so that when the logs move, the pipe flexes rather than tries to compress in a straight line (which it may not) which will then force the pipe above upwards as well. If shower cubicles are going to be installed, then we recommend using freestanding shower pods, they are very easy and economic to install (just a water feed and electric power supply required), and most importantly, they are independent from the walls which means the log cabin wall movement does not get impeded in any way. Shower pods are very easy to keep clean as there are no wall tiles with grout joints.
NB - If the vapour barrier (roof, walls or floor) is penetrated in order to feed wires and pipes (or anything else) through, it is VERY IMPORTANT that it is then sealed up again. If left as open gaps, it is possible for air moisture, water vapour or steam (if in a kitchen area or bathroom) to enter into these areas and condense thus causing timber discolouration, mould or rot. Water vapour can travel a long way within voids before condensing, and can sometimes seem like another independant problem but is in fact related. It is very simple to seal around wires but all to often neglected, causing major problems much later in the life of the cabin.
It only takes 1 screw fixed in the wrong place to cause gaps between logs in a log cabin - cabin walls use gravity to push the logs down together, if there is a gap between logs then there is something holding it up in mid air (logs do not "float" by themselves). It is just a case of working through a process of elimination to find the cause - something as simple as a curtain rail fixed into the top trim above a window where the screws are too long and go into the log behind the trim will be enough to hold the logs up in mid air and cause a gap in the wall - logs MUST be allowed to move freely up and down.
First fix electric installation.
As pointed out in our terms and conditions, installation of first fix electric by your own electrician during the build is certainly possible but could be subject to charges by the installer as this could delay the installers from being able to carry on building whilst cables are being installed due to the way the buildings are constructed and could potentially be a health and safety risk to the installation team. We can offer another option as follows -
You can request that the installation team carry out first fix electrics as they build - ie, putting the wires in the walls (if a cavity wall) and ceiling (if an insulated ceiling), you need to request this at the point of order, or soon after. The installers are not qualified electricians and cannot therefore carry out a full electrical installation, so you will still need to have your own electrician to complete the works, sign it off and issue an electrical certificate.
It is recommended that your electrician is on site the first day of the build - they will need to supply a wiring plan for the building and supply all required lengths of the correct size wire.
The installers can then use the supplied wiring diagram and wire to run the cables for the sockets and switches (the installers will quote a price based on the wiring diagram).
If you have a twinskin log cabin or a framed building (that is being insulated and lined), the wires for the sockets and light switches will be inserted within the wall cavity before being filled with insulation. This would be on a ring main, running to the position of the fuse board as shown on the electrics diagram and loose tails left coming out of the walls at the required points ready for the 2nd fix (carried out by your electrician once the building installation is complete) - second fix being the fitting of the switches, sockets, lights, consumer unit and connection to the mains.
Lighting cable will be run from the switch up into the ceiling cavity and suitable tails left hanging at the required point for the lights.
If WE are installing a framed and clad building, and your electrician wants to fit the first fix wires within the walls and ceiling using metal patresses, then this will incur extra installion fees if WE are insulating and lining the building as well. This is because WE will have to cut our lining material around each of these patresses which takes a conciderable amount of extra time. To avoid these costs, your electrician should use plasterboard dry lining (clip-in) patresses as part of the second fix instead. OUR installers can just pull the electric cable through a simple hole drilled into in the lining material and leave them as "tails" ready for YOUR electrician to insert the patresses and second fix.
NB - it is not recommended to install recessed spot lights (downlighters) within a typical log cabin or Easibuild roof, as this will damage the vapour barrier and affect the insulation of the building (downlighters require holes to be cut in the insulation, effectively leaving those particular points of the roof uninsulated.
Any Internet connection/multi media or music systems need to be discussed and quoted (at extra cost) prior to installation due to additional time required.
See lots of videos and more information about our garden rooms on our social media platforms - ![]()
![]()
![]()
![]()
![]()

